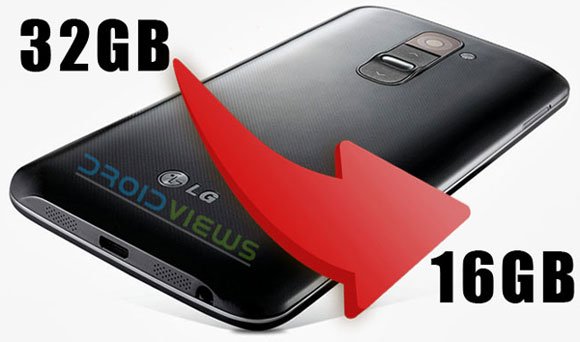
Most smartphone manufacturers release their phones in different variants depending on localizations, network connectivity and storage capabilities. Obviously, the user has to pay greater amount of money to buy a smartphone with more storage capacity. The LG G2 was released back in August 2013 in about 10 variants based on regional network types and with two models featuring 16GB and 32GB storage.
Suppose you bought a 32GB model of the LG G2, and after installing a wrong firmware, you later discover that is shows only 16GB storage! How would you feel— surprised? sad? or shocked? Well, this problems can occur to any Android device because of bad flashing but it’s certainly not a commonly encountered issue.
Just a couple of months ago, I went through this problem on my Nexus 5. I flashed the stock factory images to fix some issues in the device but the I found that my 32GB Nexus 5 turned into 16GB! You can see our guide on fixing storage issue on Nexus 5 by clicking the link below:
Your 32GB Nexus 5 Shows 16GB Storage? Here is How to Fix It!
Do you own an LG G2 and does your 32GB LG G2 shows only 16GB storage space? Most probably, you have installed the firmware meant for the 16GB LG G2, on your 32GB model. You are facing the storage issue because the configuration for device partition has changed due to the wrong firmware. Sometimes, doing a hard reset can also lead to this problem. Today, we have come up with a tutorial to fix the issue. Just follow the steps given below and you LG G2 will hopefully be back on track.
Preparations:
- Your LG G2 must be on stock LG firmware. If it is not, restore your device to stock firmware first.
- Your phone must be rooted. If you have not rooted it yet, root it using our rooting tutorial.
- Enable USB Debugging on your phone. To do this, follow this guide.
- Make sure you have installed, LG USB Drivers on your computer: Download here
- Install the Total Commander app from the Google Play: [googleplay url=”https://play.google.com/store/apps/details?id=com.ghisler.android.TotalCommander&hl=en”/]
- Download the following files:
- LG_G2_Backup_All_Partitions.zip
- LG_G2_Backup_EFS_Final.zip
- minimal_adb_fastboot_v1.1.3_setup.exe
- sdparted-recovery-all-files.zip
Instructions:
- Extract sdparted-recovery-all-files.zip file. You’ll find 9 files inside the extracted folder. Copy this folder to your device.
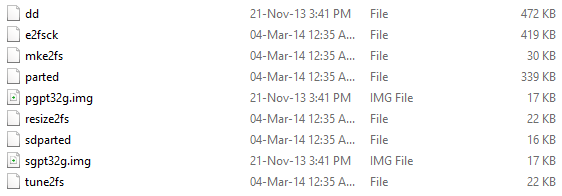
- Now open Total Commander, navigate to the above files on device and copy them to /system/ bin/ directory on your phone.
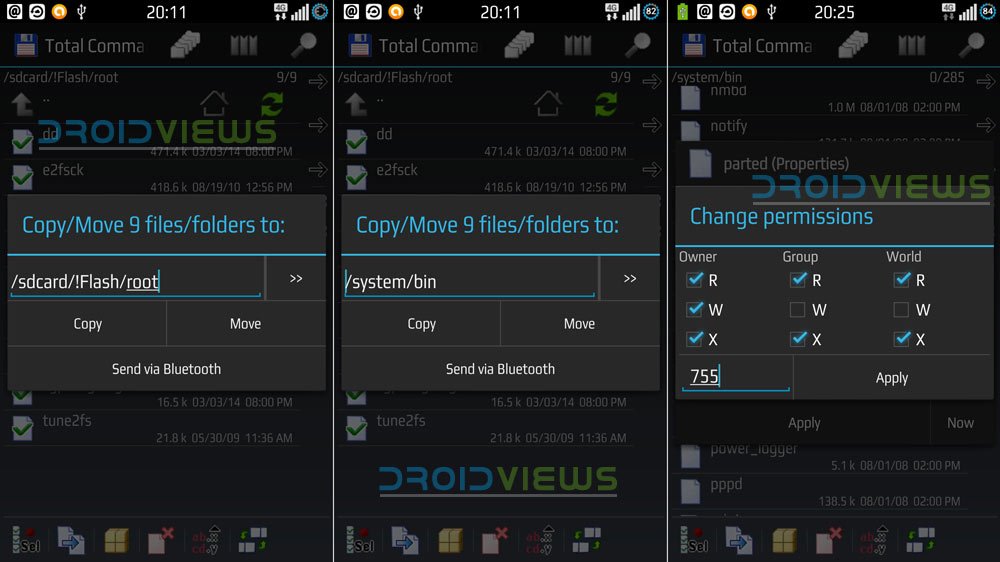
- After copying/moving the 9 files to /system/ bin/ folder, fix the permissions for each file to 0755 as shown above.
- Install minimal_adb_fastboot_v1.1.3_setup.exe on your computer.
- Now connect your phone to computer via USB cable.
- Launch Minimal ADB Fastboot tool and type the following command:
adb shell
su
cd /system
parted /dev/block/mmcblk0
- Hit Enter key.
- In case you see the following error message,
Error: The backup GPT table is not at the end of the disk, as it should be. This might mean that another operating system believes the disk is smaller. Fix, by moving the backup to the end (and removing the old backup)? Fix/Ignore/Cancel? Fix
Warning: Not all of the space available to /dev/block/mmcblk0 appears to be used, you can fix the GPT to use all of the space (an extra 30294016 blocks) or continue with the current setting? Fix/Ignore?Fix - Use “print” command to check partition details. The line 36 on the partition table should look like this:
36 15.7GB 15.8GB 37.7MB grow - Now exit the partition detail screen by typing quit command.
- Then type or copy/paste these lines in the command window and hit Enter key.
adb shell
su
cd /system
./dd if=/system/sgpt32g.img of=/dev/block/mmcblk0 bs=512 seek=61071327 conv=notrunc
./dd if=/system/pgpt32g.img of=/dev/block/mmcblk0 bs=512 seek=0 conv=notrunc
- You should see something like this-
root@android:/ # cd /system
f=/sdcard/pgpt16G.img bs=512 count=34 <
34+0 records in
34+0 records out
17408 bytes (17.0KB) copied, 0.014294 seconds, 1.2MB/s
of=/dev/block/mmcblk0 bs=512 seek=0 conv=notrunc <
34+0 records in
34+0 records out
17408 bytes (17.0KB) copied, 0.008996 seconds, 1.8MB/s
- Wait for a few seconds till it is finished and then reboot your LG G2 into the Download Mode.
- Now, you need to install the correct 32GB firmware on your phone.
- After the first boot with the new firmware installed, the phone will show only 10.7GB storage.
- Perform a hard reset from Settings> Backup and reset> Factory data reset.
- When your LG G2 boots up again, it should show 25GB user storage on SD Card.
If you also install a custom recovery on your phone, you can flash the backup script zip files from above to make a backup of your phone’s EFS and other partitions to avoid such issues in future. With the hope that the above tips would have help you claim back the actual storage capacity on your LG G2, we can now wind up our tutorial. Do not forget to share your feedback with us! Cheers!
Highly Recommended!
How to Backup and Restore Lost IMEI on LG G2
Enjoy 120FPS and 4K Ultra HD Video Recording on LG G2
Tweak and Customize LG G2 with G2 TweaksBox and G2 Xposed Modules

is there no easier way to do it…
its shows to difficult and complicated,
isnt it possible to make it as batch file ???
thnks
Nope!
Thx man !!! Its save me .. your explaining is much detailed and help me so much
finally got it !!! you guys need to check where your superuser is installed …my 9 files went into the ‘xbin’ folder, as su was in
that file.then run minimal adb and fast boot and follow the instructions
but at step 11 copy and paste the commands below as others have
mentioned these are for the xbin folder only commands and hit enter
!!!!!but hit enter again to finish the commands this second enter was
what i was missing !!! I kept on getting 33+0 records in and out but
once i hit the enter key again up came 34+0 records in and out –thats
when i finally got it!!!!!! follow 12 onwards to complete the mission !!!good luck
adb shell
su
cd /system
dd if=/system/xbin/sgpt32g.img of=/dev/block/mmcblk0 bs=512 seek=61071327 conv=notrunc
dd if=/system/xbin/pgpt32g.img of=/dev/block/mmcblk0 bs=512 seek=0 conv=notrunc
Hello nova! I used your solution and I got 34+0 in and out but only once. Then I followed the guide and my phone still have only 10,7gb … I cant figure out what is the issue here.
Please someone make a compelte guide with no errors finally.
Hi Rakesh, I have the same problem. But after step 6 I did not see any error message. Could you please??
Hi Rakesh, I am facing the same issue. but after step 11 what is the screen shot that you are getting, could you please share
Hi Vishnu, I practised and then wrote the guide an year ago. It worked for me. After step 11, you should see the following:
root@android:/ # cd /system
f=/sdcard/pgpt16G.img bs=512 count=34 <
34+0 records in
34+0 records out
17408 bytes (17.0KB) copied, 0.014294 seconds, 1.2MB/s
of=/dev/block/mmcblk0 bs=512 seek=0 conv=notrunc <
34+0 records in
34+0 records out
17408 bytes (17.0KB) copied, 0.008996 seconds, 1.8MB/s
Hi Rakesh,
Thank you, I was working on this from my LP Rom downgraded to KK and it worked.
However it is now asking for a decrypt password after installation of twrp. Any Solutions for the same.
Did you encrypt your device data in the past?
Never, Tried to restart the device now is goes only to TWRP and No Download mode as well.
Guess 100% Bricked
Repaired with a coding to retrieve download mode.
http://forum.xda-developers.com/showthread.php?p=51693321#post51693321.
It worked, Flashed ROM it is running fine now
Glad to know, Vishnu!
everything is OK.
Hi, i see this, Help me!
I reachead to the step 6 and that is what appear
IS there some news, this did not worked for me my phone shows 32 gb but 23 gb are rest thanks.
i done and show 32g but fre space is 9g . misc is 21g
bro it fixed the storage issue but now i lost my imei and network is gone… battery runs out pretty quick… tried to restore efs but nothing worked…. now my phone is of no use… any solutions ?
please send the youtube video
If I restore my previous backup via twerp recovery will it solve the issue?
Nope.
Ok thank you. . Will I follow the guide exactly as u mentioned above? ? Is there any modifications needed in the script? ? Thanx in advance
I fixed mine using the method described above. It could do the same magic for you too.
Ok.. bro will try it now. ..
bro it fixed the storage issue but now i lost my imei and network is gone… battery runs out pretty quick… tried to restore efs but nothing worked…. now my phone is of no use… any solutions ?
When i type this …
adb shell
su
cd /system
./dd if=/system/sgpt32g.img of=/dev/block/mmcblk0 bs=512 seek=61071327 conv=notrunc
./dd if=/system/pgpt32g.img of=/dev/block/mmcblk0 bs=512 seek=0 conv=notrunc
and Hit Enter then Commend Say File Not Found…. What can i do Now ?? Help Me…
fb/its.zakir
Hi Guys, I need the simplest instruction you can give to fix this issue. I tried copying the files to /system/bin/ but I got an error. I tried copying it to /system/xbin/ it was successful however, I did not go to the permission page (the 0755).
So I am stuck on this step. I hope you guys can help me. Even the LG Service Center here cant fix it and I am very frustrated. I hope you guys can help me. Send me an email- mykeyohann@gmail.com – nobody knows how to fix this here.
how go to permission page bro please reply
why always permission is denied ? file sgpt32g.img and pgpt32g.img already set 755 permission , im frustated ~_~
same here anyone help
I lose root and sim card access as soon as i transfer those 9 files. Is there a way to circumvent this? please help. thanks!
finally got it !!! my 9 files went into the ‘xbin’ folder, as su was in
that file.then run minimal adb and fast boot and follow the instructions
but at step 11 copy and paste the commands below as others have
mentioned these are for the xbin folder only commands and hit enter
!!!!!but hit enter again to finish the commands this second enter was
what i was missing !!! I kept on getting 33+0 records in and out but
once i hit the enter key again up came 34+0 records in and out –thats
when i finally got it!!!!!! follow 12 onwards to complete the mission !!!good luck
adb shell
su
cd /system
dd if=/system/xbin/sgpt32g.img of=/dev/block/mmcblk0 bs=512 seek=61071327 conv=notrunc
dd if=/system/xbin/pgpt32g.img of=/dev/block/mmcblk0 bs=512 seek=0 conv=notrunc
please help that’s what i get when i do the last two commands please help me.
Thanks man. I did the same thing and it worked. I was frustrated but after changing it to xbin and last commands. It freaking worked.
Yes this step helped me too!! Thanks all!
Thank you very much, I solved the problem, was very easy, had to copy files to xbin where my su is installed, and then change the 2 last commands, some root app install su in bin and other is xbin both folders are executables, so mine had to choose xbin and got my memory back 25go
im happy
thank you again for your support, any info im here
change last 2 commands to what???thnx in advance
Look at what folder where SU is installed may be system/bin or system/xbin, copy files and set permissions to 755 in the same folder with SU. If its 1st tape the same commands as tuto if is installed in xbin, change just the last 2 commands to :
./dd if=/system/ xbin/sgpt32g.img of=/dev/block/mmcblk0 bs=512 seek=61071327 conv=notrunc
./dd if=/system/ xbin/pgpt32g.img of=/dev/block/mmcblk0 bs=512 seek=0 conv=notrunc
I cant copy dd with total commander, others 8 files no problem, permissions fixed and my phone is rooted, but in adb I got error message ; no permissions, and if I reboot my phone I lose root and also network, do u have any idea, I tried also with fx explorer and got the same problem, thank you very much
i get the same bro. it is very frustrating!
Could you please name your sources for the below method? You simply copied my guide posted on xda. http://forum.xda-developers.com/showthread.php?t=2470207
Hi, the source is already mentioned at the end of the guide and it’s there since day 1. Also, it’s not a copy as you termed it. We have only cited the commands and files.
i wish it was an easier way to do this im so frustrated
hi all sdparted-recovery-all-files not copy to system/bin folder error read only
followed the entire procedure down to the T and it still show i have 16gb from the initial 32gb and i flashed the right kdz file too.
OK … solved with a single change in tutorial – order (at least it was to me):
./parted /dev/block/mmcblk0 – did not work,
parted /dev/block/mmcblk0 – OK
Thank you very much !!!
I do not understand anything, do not recognize commands …!
I get the same error please let me know if you managed to fix the problem
yeeees i fixed it, you have to copy the 9 files rather in the /system/xbin folder or in the /system/bin folder, and then change the permissions of those 9 files to 0755
and then with minimal adb fastboot type this: (try the following with bin instead of xbin if not working) ATTENTION don’t type ./dd but only use dd
adb shell
su
cd /system
dd if=/system/xbin/sgpt32g.img of=/dev/block/mmcblk0 bs=512 seek=61071327 conv=notrunc
dd if=/system/xbin/pgpt32g.img of=/dev/block/mmcblk0 bs=512 seek=0 conv=notrunc
and then reboot your device and finaly do the factory reset.
it’s been so many time that i’ve been looking to restore the storage.
it worked thanks
i did every thing but when i put
adb shell
su
cd /system
dd if=/system/xbin/sgpt32g.img of=/dev/block/mmcblk0 bs=512 seek=61071327 conv=notrunc
dd if=/system/xbin/pgpt32g.img of=/dev/block/mmcblk0 bs=512 seek=0 conv=notrunc
i get that error in the pic
please help