It is really a great thing to own an Android device that facilitates installing stock firmware manually. If you are an adventurous user who loves rooting and trying different custom mods and ROMs, you might be caught in a situation when you have no other choice that flashing the stock firmware back to your phone or tablet.
It was just a few days ago that I had to flash factory images on my Nexus 5. I recently tried the Cover Lockscreen app on my phone but after uninstalling it, I found that my lock screen was not letting apply any background. All features working, but no background! I tried many things to solve the issue but none of them worked at all.
So finally, I flashed the stock images to my phone. Everything went well and the problem was fixed too. However, later I discovered that my 32GB Nexus 5 was showed only 14GB as available storage on the device. The thing surprised me and vexed a little too. If your 32GB Nexus 5 shows 16GB storage only and you’ve encountered a similar issue after flashing the factory images to your Nexus 5, the present tutorial will help you solve the problem.
Disclaimer:
The method described below has been tested successfully on Nexus 5 and it should fairly work on other Nexus devices like the Nexus 4, Nexus 7, Nexus 10 and others too. The procedure, however, might prove risky if not followed carefully. Proceed at your own risk.
Preparations:
- Download the factory image file for your device if you do not have it already: Click to Download
- Download and set up the latest Android SDK on your computer: Download
- You can find more info about setting up Android SDK here.
- Also, make sure you have installed the latest Google USB Drivers on your computer. Since it is the naked driver, read the instructions given here.
- Enable USB Debugging on your device. You can do it by going to Settings> Developer options. In case you do not find this option under Settings, you can refer to our guide on making it visible.
The Procedure:
Having made the preparations mentioned above, we can now proceed to the steps to restore the device to its original storage capacity. We are going to lay out two methods for that. Try the first method first and if that doesn’t help, you can attempt the second one.
Method 1: Via Stock Recovery
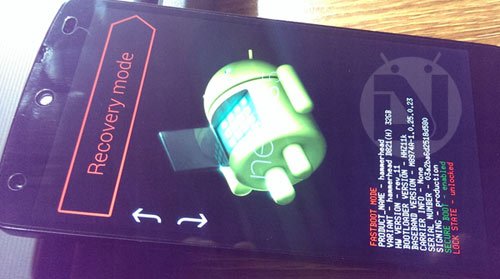
- Boot your Nexus in stock recovery. Turn it off, then hold the Volume Down + Power buttons together for a few seconds. Doing this will boot your phone into Bootloader Mode (see below). Now press any of the volume keys until you see “Recovery mode” written on the screen. Then press the Power key to select it. When you see a dead Android robot, press and hold the Volume Up + Power buttons together to enter the stock recovery. Please note that the procedure is a little tricky, so it might take more than one attempts before you can actually see the recovery mode.
- In the recovery screen, scroll to the “wipe cache partition” option and perform it using the Power key.
- Then scroll to “wipe data factory reset” and wipe it too.
- Finally, go to “reboot system now” option and select it.
- When your Nexus device reboots, connect it to your computer to check how much available storage it shows.
Method 2: By Reflashing Factory Images
In case you see the same 16GB storage on your 32GB Nexus device after performing Method 1 from above, perform the steps given below:
- Extract the downloaded factory image package with .tgz extension. In case the file you downloaded has .tar extension, change it to .tgz first so that you might be able to extract it.
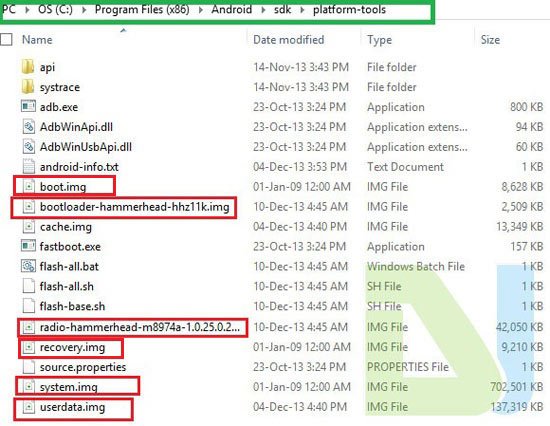
- Open the extracted folder and also unzip the Zip file found inside it. Copy the contents of the zip folder to the main folder with other .img files.
- Now copy all contents to the “platform-tools” directory found inside the Android SDK. To get a fair idea, mark the path of the screenshot below:
- Boot your Nexus 5 into the Bootloader/Fastboot mode: turn off the device, then press and hold the Volume Down + Power buttons at the same time till you enter the Bootloader mode (see the above picture).
- Connect your phone to computer.
- Press the Shift button on your computer’s keyboard and right-click with the mouse at an empty space in the “platform-tools” directory. From the list of options, select “Open command prompt here” option to launch a command (cmd) window.
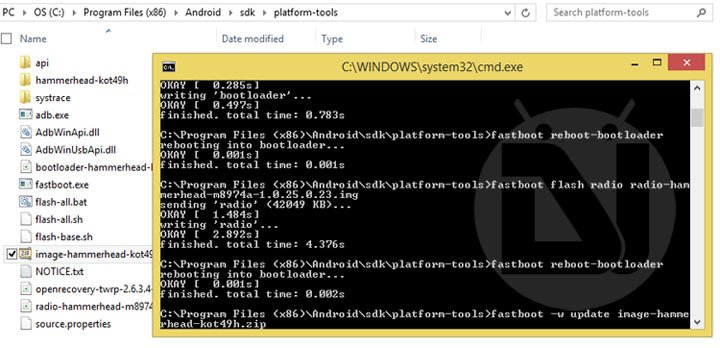
- Now start issuing the following commands one by one. Do not forget to replace the names of the bootloader and radio files with the corresponding files downloaded by you.
fastboot erase boot
fastboot erase cache
fastboot erase recovery
fastboot erase system
fastboot erase userdata
fastboot flash boot boot.img
fastboot flash bootloader bootloader-hammerhead-hhz11k.img
fastboot reboot-bootloader
fastboot flash radio radio-hammerhead-m8974a-1.0.25.0.23.img
fastboot reboot-bootloader
fastboot flash recovery recovery.img
fastboot flash system system.img
fastboot flash userdata userdata.img
- When all is done, highlight the Start option on the Bootloader screen using Volume key and then press the Power button to reboot the device.
Your Nexus device will reboot. Perform the welcome setup and check how much storage it shows now. Your phone should now show 32GB memory. Enjoy!


Files are gone Can you re upload and update links please
Hi, just checked! all links are working. Can you please specify which link or links are not working for you?
Download and setup the latest Android SDK on your computer: Download give a Opps
I verified I have a 16gb unit so I don’t need it any more thanks for replyingling
Ive tried EVERYTHING I foung on the internet. Do a factory reset, tried to resize the partition using TWRP, flashed manually all the partitions, flashed the stock image, flashed customs roms, tried to erase the userdata, cache and system partitions tons of times and NOTHING worked. In all the process my phone started with no problems, but my internal storage stayed 12,55gb. My Bootloader shows 32Gb model, the IMEI on LG database shows 32Gb model AND the logic board indicates a 32Gb model… I really don’t know what to do! Anyone can save me???? Thanks!
I had this issue and the only thing that solved it was to do a factory reset from the setting menu. formatting userdata and flashing factory images didn’t help at all ( nexus 5x)
I’ve tried method 1, which didn’t work. I’ve also tried to increase the partition manually by using “resize2fs” in command-line, but it didn’t work either. Finally I’ve used TWRP => “wipe” menu => checked “data” => “repair or change file system” => “resize”, and it worked.
Did the method 2 and now stuck at the boot animation for about 2 hours.. None of the other manual flashing steps involve erasing boot.img.. maybe that messed up the phone or something.. any ideas for how long i need to wait or should i flash everything again?
Thank you. Procedure 1 worked for me though I had to sacrifice some MB to re-install my app! Thanks again.
This bug is still present in the Android M preview… Hate the damn thing. We need a fix, not work arounds. Come on Google!
Thank god I am not the only one with issues on M. I have lost the count of how many times I have flashed M just to take rid of this bug. And still no luck.
Yep, I have been searching for a solution since I flashed M and found this thread. At least it is not just me.
Did you guys check after doing a factory reset?
Same Issue here on the final release of Android M 6.0.
Solved doing a factory reset from the stock recovery.
i just did a factory data reset from settings,it solved the problem
thankyou so much the first method workss! 😀
Thanks a lot!! These steps worked for me, while flashing Android 5.1 on my Nexus 5. Could see only 12.55GB on my 32GB phone.
One tip though, once you enter the stock recovery mode, you can see the dead android with a red exclamation.
At that point, press Power Button ‘FIRST’ and while holding it, press the Volume UP ‘ONCE’. That should give the stock recovery commands.
got this issue going from 5.0.1 to 5.1.0 via factory install on Nexus 5. i got the dreaded system.img missing error and had to do manual ‘fastboot flash…’ commands. i did them all and i am wondering if this is the critical difference versus using flash-all.bat’s ‘-w update’ command using the .zip. anyway, i tried just wiping cache. that did not work. a factory reset did work–all 32gb storage visible now.
OR.. Just go to back up and reset and do factory reset. Just tried that after reading the article , thinking that there must be a less tedious alternative , annd it works. Try it before going through this tutorial! Can save much of your time.
Is there a different way to do this if you’re rooted? I don’t wanna flash back to stock if I can help it. I’m rooted on stock 5.0 TWRP recovery. I used the Nexus Root Tool Kit to flash back to stock and re-rooting after buying the phone with an unofficial CM12 build already on it. (it showed 32gigs then, and recently I noticed it’s only showing 16 now)
add the command “fastboot flash recovery recovery.img” to complete the guide!
I just installed lollipop, my N5 showed only 16gb then try method 2 and my phone couldnt start. Then re install lollipop and still have only 16gb.
Erase userdata and reflash it. Then enter system recovery and perform a data factory reset.
Please help me !!!
I try to do follow method 1 & 2
But my phone still show 16GB…
didn’t work the closest i got was at 26gb which was with method 1
Well, it means that you achieve the goal. The 32GB model shows only about 26 GB as available memory. about 3GB is consumed by system files and OS..
Hey there, I somehow got this exact problem and my 32g nexus 5 has been reading as a 16g for days now! Very frustrating to say the least. I have followed the directions in method 1 and 2 exactly and everything was successful except my nexus still reads as a 16g!! Idk what to do but I’m starting to get really frustrated. I have flashed the factory image to my nexus, idk how many times now even, on both an iMac and a Windows 8 PC, I’ve booted to stock recovery numerous times and done numerous factory resets, and still 16g???? Any other advice on what I can do?? Or why my 32g nexus is still showing wrong after several restores?? In need of dire help!!
After 5 failed attempts to erase user data I skipped that step and now its stuck at writing ‘radio’ . . . when flashing radio
How long should the erasing user data part take? it seems like its freezing for me when i get to that part..
It take just a few seconds.
your help is good intend but for ppl who dont know much about adb and fastboot it will be horrifying !
u didnt mentioned to flash boot ! boot and bootloader are separate thing .
i did what u said and u know whats happpended ? device wont boot and show even gogole logo at first 🙂
add flash boot to your method and it will be okay without boot.img there will be no device boot .
Hi, thanks for drawing attention to that little but big mistake. We have already fixed that. 🙂
You need to include fastboot flash recovery recovery.img
I dont see fastboot mode. As while flashing KitKat 4.4.2 image i missed to flash bootloader img.
Rakesh, what if I dont have a bootloader? I mean didnt flashed it while flashing factory image and rebooted it. Now I m under Stock recovery.
I tried to update it through ADB under Stock recovery. But when I flash any img file it says “e footer is wrong “
Didn’t you flash the bootloader image?
I missed it accidentally.