If you want to root your Android and love flashing mods, ROMs, TWRP is a must-have thing. Today we’ll explore all TWRP Recovery features and explain all TWRP options. This is an ultimate TWRP guide explaining how to flash ROMs, mods, and recovery images, wipe Android device partitions data and cache, create and restore backups and other tips and tricks.
If you’re someone who has ever tried to flash a custom ROM, flash any mods or even root your Android smartphone, you probably have already heard of TWRP recovery. TWRP recovery has replaced the ClockworkMod recovery (CWM) as the most popular custom recovery around. Today, it’s your only option on most devices if you’re looking for a custom recovery. If you’re new to the world of Android custom ROMs and mods, TWRP can also seem a little overwhelming. Even though the recovery’s UI has been designed quite nicely, it just has so many TWRP Recovery features that can confuse some new users. So let’s explore what TWRP recovery is and what it can do.
What is TWRP Recovery?
Before we begin our ultimate TWRP guide, let’s understand what TWRP is. If you didn’t already gather this from all the mention of custom recoveries above, TWRP is a custom recovery. Custom, because it is developed for your Android device by a third-party, i.e., someone other than your device manufacturer or you. TWRP stands for TeamWin Recovery Project which first saw the light of the day back in 2011. Back then, recoveries, especially custom recoveries did not support touchscreens. This was ironic considering our devices were already full touchscreen. To navigate a recovery back in the day, users had to rely on hardware buttons such as the Volume and Power buttons. TWRP looked to change that with a UI made for touchscreen navigation.
Not only that, but TWRP also piled up on many features over its rivals that we today take for granted. Support for themes is one, which is why you may find TWRP recoveries look all different on some devices. TWRP recovery also allows users to flash multiple zip files at once. Earlier, if you had to flash multiple files, you had to do it one by one. The TWRP recovery also allows you to directly browse and manage files on your device from within the recovery which can be really helpful. This popular custom recovery is littered with such convenient features all over.
How to Install TWRP Recovery on Android Devices
Well, there’s no universal method of installing TWRP recovery on Android devices. To be able to flash TWRP on your device, you must ensure that it has an unlocked bootloader. If your device has a locked bootloader, you must unlock it first.
On most Android devices that run the stock Android-based ROMs, TWRP can be flashed using ADB and Fastboot commands:
fastboot flash recovery recovery.img
If you own a Samsung device, you can install the ‘TWRP recovery.tar’ file using Odin tool.
On some devices with locked bootloaders, you can temporarily boot TWRP using the following command:
fastboot boot recovery.img
DroidViews is full of TWRP installation tutorials for Android devices from all major manufacturers like Samsung, Huawei, OnePlus, Google, Xiaomi, LG, ZTE, HTC, Sony and others. To find a guide for your device, please click the above link or make a search by clicking the ‘Search icon’ on the header bar.
How to Access TWRP Recovery?

The method to access recovery mode on Android devices is the same regardless of the make and build. It is also quite different for devices from different OEMs, often different between devices from the same OEM as well if you’re trying to access it using hardware buttons. A much simpler way would be using ADB if you have access to a PC though. ADB can be easily installed on your computer whether it’s a Mac, a Windows or a Linux PC. Before you can use ADB though you’ll need to enable USB Debugging on your device found under Developer options.
With your device connected to your PC via a USB cable, simply push the following command in ADB to reboot your device in recovery mode.
adb reboot recovery
Your device will then boot into whichever recovery is installed on your device. So in order to boot into TWRP recovery, you’ll first need to flash it. Our website is full of guides that’ll help you install TWRP recovery on many Android devices.

Some Android devices can be directly rebooted into recovery or fastboot modes once you’ve toggled on a switch in the Developer options. This is labeled as the Advanced reboot. With that enabled, you should see an Advanced reboot option or options to reboot to recovery or fastboot when you press and hold the Power button.
TWRP Guide Explaining all Its Features
Without much ado, let’s check out the features of TWRP one by one and learn how to use them. Keep reading our TWRP guide to get a full understanding of all its aspects.
Create & Restore NANDroid Backups
One of the first things you would want to learn about TWRP is how to flash zips. However, the first thing that you should learn is how to create a NANDroid backup. A NANDroid backup saves all your apps, their data, your settings, and just about everything from the boot image to the system partition in a zip file. This is really helpful when something goes wrong while flashing zips. Restoring a NANDroid backup will restore your device back to the original state that it was in when the backup was created.
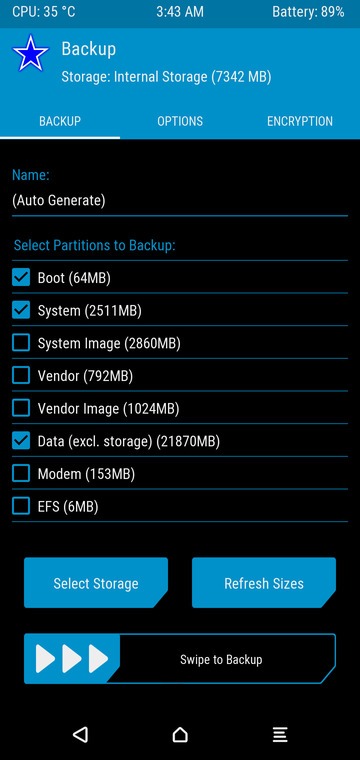
From the TWRP main screen, select Backup. You can select or deselect the partitions that you want to back up, but in most cases, it is better to leave the selection as default. Select the storage that you want to save the back up in. NANDroid backups can be huge and can take as much as 16GB of space depending on various factors. You may not want to save it on the internal storage of your device. When you’re ready, just swipe at the bottom to start the backup process.
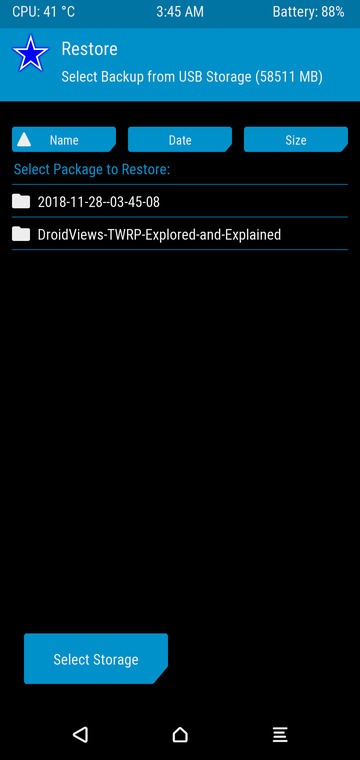
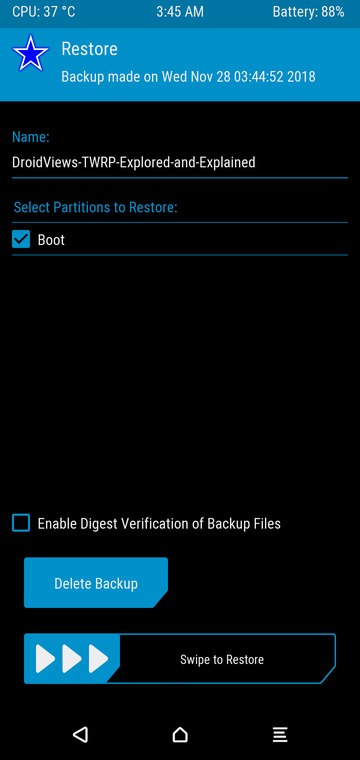
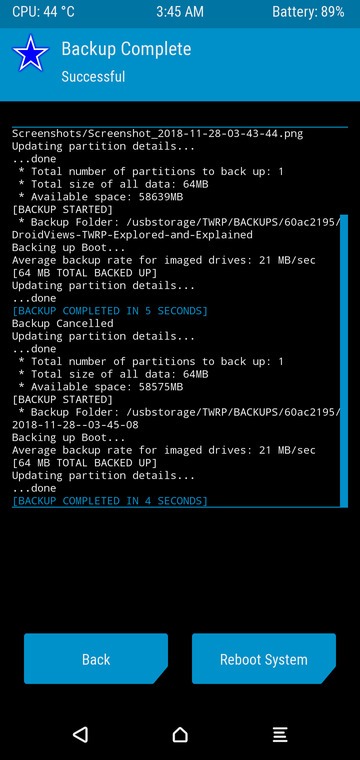
The backup process can take quite a while but when it’s done, you’ll have a set of image files in the TWRP folder of your selected storage device. TWRP names the backup according to the date and time of the backup by default. When you want to restore your device back to its original state, just select Restore from the TWRP main screen and select the backup you want to restore from. Then select the partitions that you want to restore (again, better to leave them as it is) and swipe at the bottom to start the restoration process.
Using USB-OTG in TWRP
If your Android device supports USB-OTG, you can create a NANDroid backup and save it to your USB-OTG flash drive storage. Later, you can use the same USB-OTG drive to restore the NANDroid backup you created earlier. This is a good thing to do if your device doesn’t have an external microSD card slot. Please note that if you plug in an OTG, you won’t see it listed in TWRP unless you reboot recovery using Reboot > Recovery option.
Wipe Data in TWRP Recovery
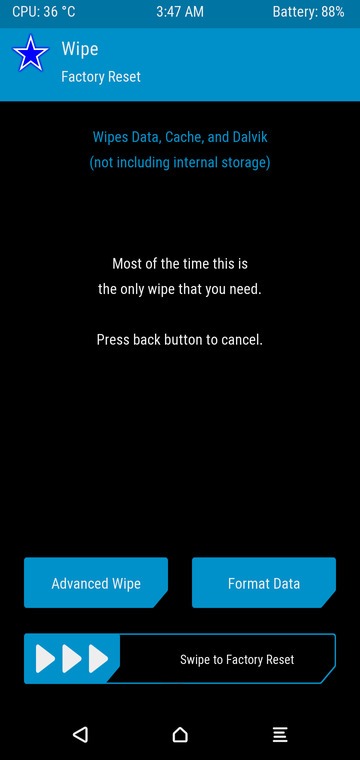
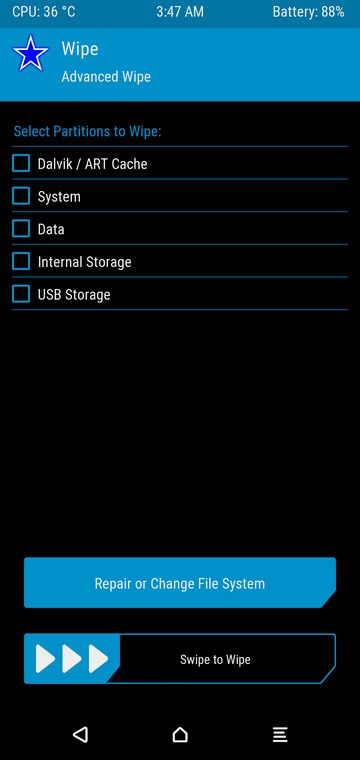
You can factory reset your device from the TWRP recovery. You can do this by selecting Wipe > Format data and then typing yes. That will wipe your device clean and restore it to factory settings. This will also wipe everything on your device’s internal storage. Where TWRP excels is allowing you to select exactly which partitions of your device you want to wipe. When you select Wipe > Advanced wipe you can select the partitions that you want to wipe and then swipe at the bottom to confirm the wipe.
Flash ZIPs and Image (.img) Files
Any custom ROMs or mods, kernels, etc. that you can flash in a custom recovery are distributed in a zip archive format and flashing zip files is pretty simple with TWRP. On the main screen just select Install, navigate to the downloaded zip file and select it. You can add more zip files to the queue by selecting Add more zips. You’ll then be allowed to select another zip file. The process can be repeated to add as many zip files as you’d like.

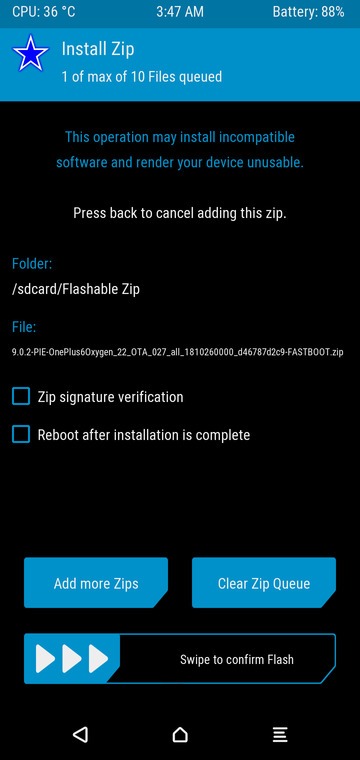
To be safe, it is better to not flash more than a few zip files at once. Unless you’re entirely sure none of the zip files will cause problems, it’ll be near impossible to figure out which of the zip files are to blame if a problem does occur. When you’re ready to flash, just swipe at the bottom and TWRP will flash the selected zip files. In most cases, TWRP will stop flashing if you flash a wrong package not intended for your device or ROM and give you an error. It’s still a good idea to make sure you’re flashing the correct zip packages.
TWRP can also let you flash image files which can be a boot image, a recovery image, or something else. The method to flash them is entirely the same except that you’ll have to select Install Image after selecting Install from the main screen.
Reboot & Advanced Features
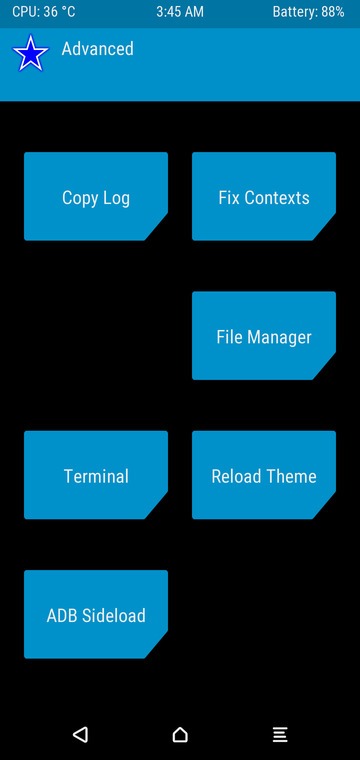
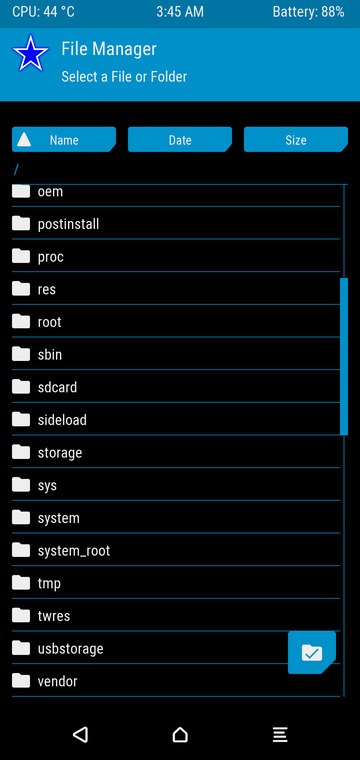
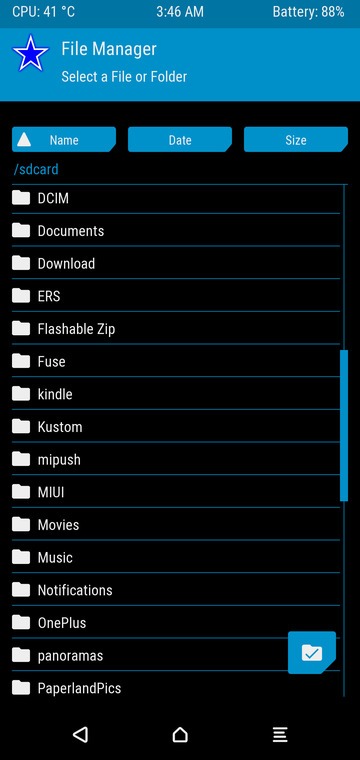
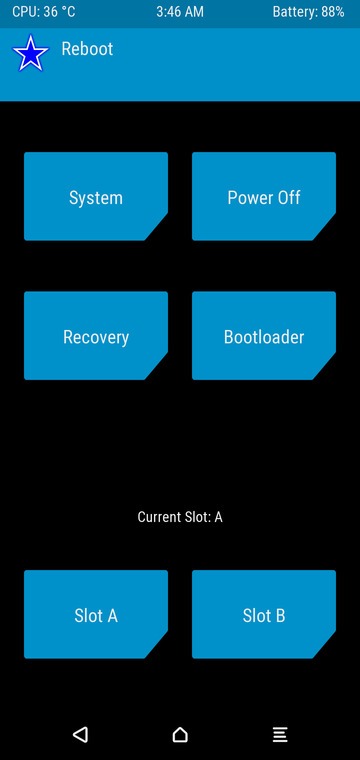
Extending our TWRP guide, we’ll now check reboot and advanced features on this custom recovery. The Advanced features section contains features such as a built-in Terminal and a File Manager. You probably won’t need to use the Terminal as often unless you’re someone who really knows how to use the command line. The File Manager can often come in handy and so can the Fix Contexts option.
This restores the default file permissions for all system apps and files. Under the Reboot section, you can find options to reboot to the System, Recovery, Bootloader or simply Power off the device. On devices with dual boot slots such as the OnePlus 6, OnePlus 6T, Pixel 2, Pixel 3, etc. you’ll also be able to reboot to different slots.
Having learned TWRP recovery basics and mastered it, you may also want to learn how to install custom TWRP themes and take capture screenshots in TWRP:
Download Latest TWRP Recovery for Your Device
You can download the latest official TWRP ZIP and IMG files for your Android device from the official TWRP website. Having installed TWRP Recovery, you can manage and update it using the Official TWRP App from the Google Play Store. You can also download the latest TWRP APK from here. Finally, if you like our TWRP guide, please share it with others. Thanks!
[googleplay url=”https://play.google.com/store/apps/details?id=me.twrp.twrpapp”]Note: This article was first published in April 2013. Since TWRP recovery has changed radically over years, we decided to get it rewritten with updated stuff.
for me under advance wipe the option repair or change system files is not working when touched it says invalided bla bla bla also I can’t wipe anything
Which TWRP version have you been using and on which device?
For me, it’s TWRP hands down. Cleaner interface, more complete set of features (file manager and command terminal), and it works better. CWM latest update seem to be more glitchy on my device.
Hi now I cannot even get to the TWRP option, I do not know if it is also wiped off my android. I do have it on my SD card but it will not load in CWM. Really frustrated, I tried everything and still cannot get past the flashing SAMSUNG logo.
Please someone help!!
Assuming your device is rooted, download and install Flashify from the Play Store, download the correct version of TWRP for your device (get the .img file), now open Flashify and choose Flash/Recovery/Choose file. Select the “.img” file you downloaded, and flash it.
This will install TWRP as your recovery replacing anything els you may already have.
Done.
Hi Rakesh, Last night I tried to install a new ROM (paranoidandroid pn_n7100-5.1-20151113) using TWRP v2.5.0.1 I guess I followed all the steps correctly until my device – galaxy note 2 GT-N7100 got stuck after rebooting. The phone is still stuck on the SAMSUNG logo and does not load my apps at all it goes as far as showing the logo flashing as usual. When I reboot Note 2 shows device model and logo and never loads apps on screen. In TWRP it says root permissions appear to be lost & fix SuperUser permissions and when I swipe to fix that the device reboots to model >logo and stays stuck thereon forever..
Your help would be much appreciated
Martin
Martin
How did you took screenshots during RECOVRY?
See this: https://www.droidviews.com/take-screeshots-in-cwm-twrp-recovery-mode/
Thanks man..
Is there any way to screen record the recovery process?
Unfortunately, no!
i’ll be very thankfull
please tell me how i can use twrp in nokia xl
Last night I was on my phone, on the main that says “Team Win Recovery Project v2.7.0.2” on the top, and then the 8 boxes saying “Install, Wipe, Backup, Restore, Mount, Settings, Advanced and Reboot”. (If it helps the lock screen on this screen is a TWRP padlock which is unlocked, and a “swipe to unlock” bar on the bottom”). I clicked on Reboot, and then System (expecting there to be another “are you sure option” at that point but there wasn’t). My phone turned off then on again, and now the vast majority of the apps (including Chrome, Google Play, the clock/alarm app, YouTube, games etc.) have all gone, and the remaining ones largely do not work, with a message that says “Unfortunately, ***app name*** has stopped working” appearing. How can I recover all the files I’ve just lost!? How can I get everything back? Please, please, please help. My phone is a HTC One M8.
Looks like you have mistakenly wiped some system files. Which ROM are you using?
Firstly, thanks for replying, even if you can’t help it’s appreciated. Honestly I’m not quite sure what ROM I’m using. How do I find out?
My Lg g2 has a deadzone in the path of the swipe to wipe. Is there a different way I can wipe it?
Hey there, im using a note 3 sm n9005. I have an issue regarding backup and restore,as it says in the article above before flashing any rom it is required to wipe cache/dalvik/data/ and SYSTEM, known as fail proof method. When ever i flash a rom using this method, the back up i create before flashing the rom (which is really necessary) doesn’t show in the restore tab even though i can access the backup in my file manager. This happens only when i wipe the SYSTEM partition. I tried flashing it without wiping the system partition the normal (factory reset) way, well in this case the back up i created is shown in the restore tab. Does this happen because of wiping the SYSTEM partition? and is this a universal problem??
There might be some issue with the specific version of TWRP you’re using. Install a different version and it would work fine.
Im using a note 3 n9005 uk version Whenever I flash a rom or custom kernel everything changes but not baseband ..I’m getting md5 skipped in twrp ..and my Baseband not changing even I flashed a rom of upgraded
And my data plans are getting so slow even I’m having 3g signal..??
Flash the firmware with a PIT. It should be fixed.
I haven’t found the pit file for lollipop bob6 firmware as I flashed rom with a zip .and when I did flash in rom via twrp it showed md5 is skkipped
PIT- https://www.droidviews.com/how-to-extract-pit-file-from-samsung-galaxy-devices/
what does this mount function do exactly and how is it helpful?
If I was just to back up my user data then change ROM could I restore the data using twrp to restore all my apps to the new ROM or would I need to install each app manually. Eg going from Samsung s4 standard 4.2.2 to Google 4.3 and keeping all data??? Thanks in advance
While switching between different ROMs, it is not recommended to restore apps that has been backed up some other ROM. If you do so, you’ll face various issues. Better install them manually. Backup apps using App Backup and Restore app, it will make thing easier while restoring: https://www.droidviews.com/backup-apps-contacts-logs-messages-and-settings-without-rooting-your-android-phone/
That’s great thank you!
I screwed up TWRP recovery with a bad ROM and now the recovery can’t read my zip files, except when only “system” is mounted. So now I can only install the backup. It isn’t terminal, but how do I fix it?
Just re-flash the recovery again 🙂
All this stuff is kinda new to me. From searching the web, I think i messed everything up by going back and forth between 4.1.1 and 4.2.x roms. The zero folder is messing everything up. I got back to stock and deleted the zero folder. Crossing my fingers whether it works.
Nothing as such my friend. Just reflash the recovery or change it and use CWM