We know that we have come up with this tutorial rather late. Thanks to one of our users for reminding us that we do not have it yet and therefore we are here to fill that vacuum with an easy tutorial for rooting and installing ClockworkMod Recovery on the LTE variants of the Samsung Galaxy S3 from carriers like T-Mobile, Sprint, AT&T and Rogers. To put in terms of model numbers, the procedure given below can be used to root the following devices on ICS and Jelly Bean: SGH-T999, SPH-L710, and SGH-I747/M.
If you have any of the above-mentioned variants of the Galaxy S3, you can root it in a fun way just by following some easy steps. But before you proceed, we would like to remind you that rooting your device will void its warranty and if you do not follow the procedure carefully, it might also soft brick your phone. As you know, prevention is better cure and therefore you are advised to be careful while you do the steps for rooting and installing CWM Recovery on your Galaxy S3.
Should you Root your Phone?
To Root or not to Root, That’s the Question!
Preparations before Rooting
Ready! The tutorial has been divided into 2 parts that involve installing the custom recovery and then flashing the rooting package using the recovery. Okay, now make sure you take care of the following things and download the tools and files required for the drill.
Required Downloads for Android 4.1.2:
- Download the Odin tool and unzip it on your PC: Odin3-v1.85.zip
- Download the rooting package, unzip it and copy the SuperUser.zip file to your phone: Galaxy-S3-Root-Package-US-Canada.zip
- Download and install the Samsung USB Drivers on you are computer. If you have already installed Kies on your PC, you need not download the drivers. Make sure that Kies is not opened while you use the Odin tool.
Required Downloads for Android 4.3:
If you have updated your Samsung Galaxy S3 and it has Android 4.3, download the following files to root and install a custom recovery on it:
- Download the Odin tool and unzip it on your PC: Odin3-v1.85.zip
- Download the CWM/TWRP recovery file corresponding to your Galaxy S3 model: Click to Download
- Download latest version of SuperSU zip file: Download Here
Precautionary Steps:
- Charge you phone to at least 60% of battery level.
- Rooting does not wipe any data from your device but we recommend that you create a backup of your contacts, messages, call-log, apps, etc. before as a precaution. You can use these useful apps for the purpose.
- Turn on USB Debugging from your phone’s Settings> Developer options.
Installing CWM Recovery and Root Galaxy S3
Having made sure that you have gathered all tools and made all preparations described above, you can move on with confidence to root your phone. So let’s now install the CWM recovery first.
- Turn off your phone and boot it into Download mode: hold down the Volume Down, Home and Power keys simultaneously for about 3-4 seconds till you see a warning screen. Press the Volume Up key to continue to the Download Mode.
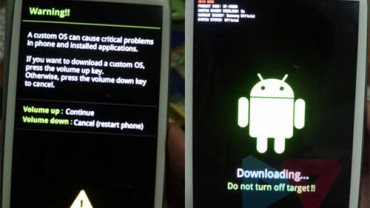
- Open the Odin folder and run Odin3-v1.85.exe. When it is launched, connect your Galaxy S3 to computer and wait till the ID:COM port at Odin turns blue and you see “Added!!” in the message box below. This indicates a successful connection and if you do not see this, make sure that the drivers have been installed and the USB cable has been properly connected.
- “Auto Reboot” and “F Reset Time” options are selected by default. Make sure that you deselect “Auto Reboot“.
- Now click on PDA button and select the “RecoveryGalaxyS3USCanada.tar” file.
- And then hit the “Start” button on Odin. This will initiate installation which will take just a few seconds. ClockworkMod Recovery has now been installed on your phone but it is not rooted yet.
- Since we did not choose the phone to reboot automatically, we’ll have to do it manually and boot it into CWM Recovery mode this time. This is how you can do it: pull out the battery and place it back after about a minute. When the phone is turned off, press and hold the Volume Up + Home + Power keys at the same time. Keep these keys pressed till your phone vibrates and you see the Samsung logo with device name. Then release the power keys but keep the other 2 keys pressed till you see a menu in blue text.
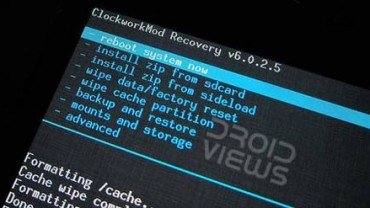
- Note that you will have to use hard keys like the Volume and Power buttons to scroll and select options. Scroll down to “install zip from sdcard” and select the rooting package file “SuperUser.zip” and confirm the selection.
- When it is installed, go back and select “reboot system now”.
Your Galaxy S3 SGH-T999/SPH-L710/SCH-I747 will boot now and you will see “Android is upgrading..” message on the screen. When this is finished, you will be able to see the lockscreen. Now open the app drawer and launch the SuperSU app from there. Update its binary if prompted. Your S3 is now rooted. To verify the root, download the Root Checker app and run it. If it says “Congratulations! This device has root access!”, the operation went successfully. Enjoy your newly rooted phone. Cheers!
[googleplay url=”https://play.google.com/store/apps/details?id=com.jrummyapps.rootchecker”]
Also Read:
Best Custom ROMs For T-Mobile Samsung Galaxy S3 SGH-T999 [2013]


fellowvoyager DroidViews Anyway, I have already added the new files needed to root 4.3. Thanks! 🙂
DroidViewsfellowvoyageroops overlooked that it was 4.1.2 that makes sense 😉
fellowvoyager Hi, as you can see, the guide was written for the above-mentioned models of Galaxy S3 on Android 4.1.2 and it works great on that version.
I’ll update the post and add new files for Android 4.3. Thanks! 🙂
DroidViewsyou can download a great unix terminal for windows thats called Cygwin this will allow you to convert the .img file. Or here is a great link to an up-to-date tar file for CWM 6.0.4.3: http://goo.im/devs/mskip/recovery/samsung_galaxy_s3
DroidViewsp.s. you need CWM 6.0.4.3 tar file and you need the SuperUser v1.86 zip file in order to install SuperUser through CWM before you install/update through playstore.
DroidViewsI have sph l710 v4.3. Both your SuperUser zip file and your CWM versions are out of date. root will not work with resources in the links above. Good method if you find the up to date zip files and you also need to be able to convert recovery.img to a tar file and you need a unix terminal for that. everything else in the instructions, great! I now have root access as well as CWM 6.0.4.3 and SuperSU 😉 thanks
What is the firmware version and model number of your phone?
I went ahead and installed the .zip archive and it worked but it installed CWM v5 not v6 so of course it fails to open and it fails to mount because its older version… can’t find working new version anywhere
Instructions say after pressing the PDA button we can choose the .tar file. This .tar is not present in the download pkg that your link says to download. It comes in the format of a zip and when you extract the file it opens as recovery.img not .tar how do we convert the file? or what do we do to acces .tar file??
Hi Rakesh, I tried rooting my phone using this tutorial but end up in a brick phone :). I was unable to load CWM onto the phone using Odin.
Here is my setup:
Windows 7 (running on vmware on macbook hardware) – no Firewall no antivirus
Installed samsung kies and drivers
T-mobile S3 ( SGH -t999) non LTE model ( Mid 2012)
Odin was able to communicate with the phone, After i started the process i got this error
“NAND Write Start!! Complete(Write) operation failed”
Now I can’t boot into the phone since it throws firmware error
Any ideas? what went wrong?
What is your firmware version?
To recover your device download this firmware: http://samsung-updates.com/details/9730/Galaxy_S_3_T-Mobile/SGH-T999/TMB/T999UVDMD5.html
and install it using Odin. Use the steps given here: https://www.droidviews.com/how-to-downgrade-firmware-on-samsung-galaxy-devices/
7th step, my phone is showing “E:signature verification failed”
It means you do not have CWM installed on the phone. If it is so, install it first. Otherwise I think there might be some problem with the zip file itself.
my phone is running very slow after i rooted it… why is this happening?
Sounds weird, my friend! Rooting does not make phone slower as it only pushes SuperSU into the system. Anyways, you can try these:
1. Reboot phone a couple of times.
2. Do a factory data reset from recovery
3. Install a custom ROM
http://droidviews.com/2013/best-custom-roms-for-t-mobile-samsung-galaxy-s3-sgh-t999/
It Worked Like a Charm. Thanks so Much!!! 🙂
Nice.
can we unroot the s3 and remove the cwm from it ?
The best and easiest way is to flash the official firmware back.