The Galaxy Tab A 8.0 belongs to Samsung’s A Series of tablets and has been there in the market for more than a year and a half now. The device was released in May 2015 with Android 5.0 Lollipop and started receiving the Marshmallow update in October last year. If you own this device with model number SM-T350/T355/SM-P350/P355 and have been looking for a way to root Galaxy Tab A 8.0 on Android Lollipop, Marshmallow or Nougat firmware, we got you covered here.
By following our detailed tutorial, you will not only be able to root your Galaxy Tab A 8.0 (SM-T350/T355/SM-P350/P355) but also install TWRP recovery in it. Having rooted your tab, you can enhance its usability through a plethora of apps and tools that require permission to function. Moreover, if you have a custom recovery installed on your device, you will be able to enjoy latest custom ROMs and mods to further enrich your experience.
Similar Post: Install TWRP and Root Galaxy Tab A 9.7 [SM-T550/ T555/ SM-P550/ P555]
Warning
Please note that this rooting guide is meant only for the Samsung Galaxy Tab A 8.0 only. If you are not sure about the model number of your tablet, go to Settings > About device and check it. if your device’s model is not mentioned on this page, do no proceed. We have taken utmost care in describing the steps but for a happy ending, you need to follow it carefully. And finally, a formality! Please proceed at your own responsibility.
Getting Prepared
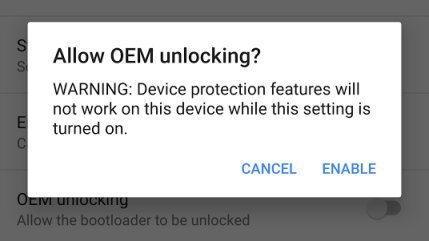
- Go to Settings » About phone » Build number and tap it 7 times to enable Developer options on your device. Then go back to Settings » Developer options and enable USB Debugging and OEM unlocking (if available).
- Backup your Tab’s apps, data and any important stuff stored on the internal storage as a precaution.
- Charge your device and make sure it has 70% battery level when you start.
Downloads
Download TWRP and SuperSU
Download TWRP 2.8.7.0 for Lollipop Firmware
SM-T350: twrp-2.8.7.1-t350.tar
SM-T355: twrp-2.8.7.1-t355.tar
SM-T357: twrp-2.8.7.0-t357.tar
SM-T550: twrp-2.8.7.1-t550.tar
SM-T555: twrp-3.0.2-1-t555.tar
SM-P550/P555: twrp-2.8.7.1-P550.tar
SM-P350/P355: twrp-2.8.7.1-p355.tar
Download TWRP 3.0.2.1 for Marshmallow Firmware
SM-T350: twrp_3.1.0-1_sm-t350_18317.tar
SM-T355: twrp_3.1.0-1_sm-t355_16317.tar
SM-T357:
SM-T550: twrp_3.1.0-1_sm-t550_13317
SM-T555: twrp_3.1.0-1_sm-t555_13317
SM-P550: twrp_3.0.2-1_SM-P550_mm_15816.tar
SM-P555: twrp_3.0.2-1_SM-P555_mm_15816.tar
Download TWRP 3.1.1-1 for Android Nougat Firmware
SM-T355: twrp_3.1.1-1_sm-t355_251117.tar
Download Root Package for Galaxy Tab A 8.0
CF-Auto-Root for Lollipop Firmware: sm-t350_p350_p355_cf-autoroot.tar
SuperSU for Marshmallow and Nougat Firmware: SR5-SuperSU-v2.82-SR5-20171001224502.zip
Root Galaxy Tab A 8.0 (If you downloaded CF-Auto-Root file)
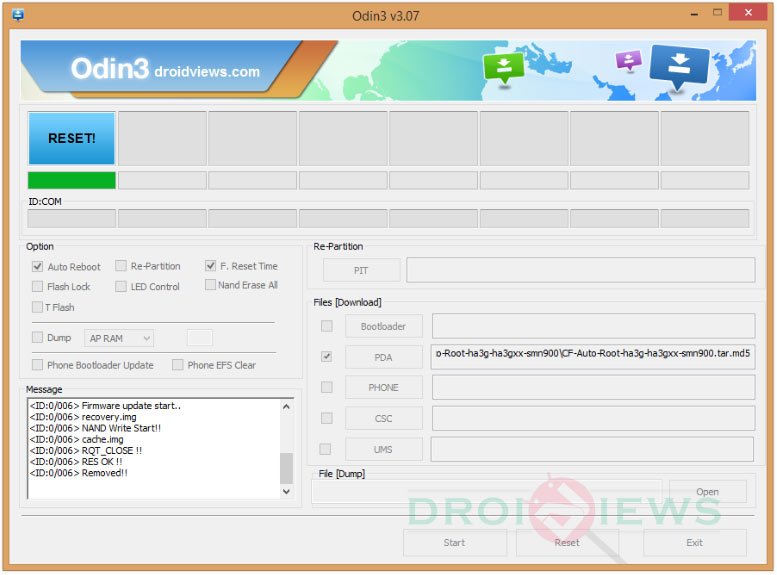
- Download and extract the Odin ZIP file to your Desktop.
- Copy the TWRP recovery and CF-Auto-Root (.tar/.tar.md5) files to the Odin folder.
- Boot your device into the Download mode:
- Turn off your Galaxy Tab A 8.0.
- Then press the Volume Down, Home and Power keys simultaneously until you see the warning screen. Press the Power button to confirm and enter the Download Mode.
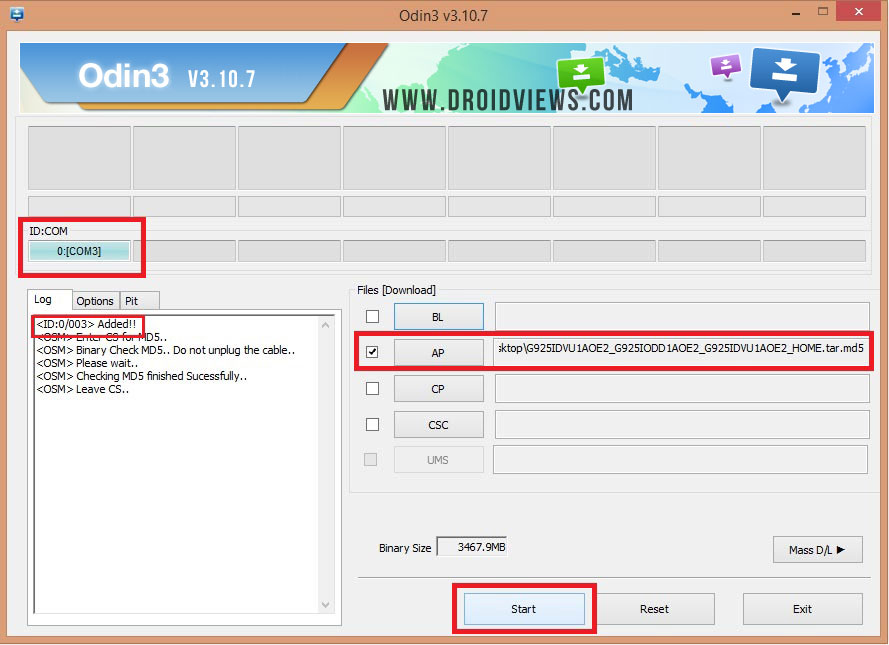
- Connect the Tab to the computer using a USB cable. When your device is detected by Odin, the ID: COM port will turn blue.
- Now, click the AP tab and add the CF-Auto-Root file.
- Click the Start button to trigger the installation.
- When the installation is finished, you will get PASS! message in Odin and your device will reboot automatically.
- Once the CF-Auto-Root is installed on your device will have root privilege. If you want to install a custom recovery too, download the correct TWRP .tar file from above and install it using the same steps you performed while installing CF-Auto-Root.
That’s it! Your Galaxy Tab is now rooted and has TWRP recovery installed on it.
Root Galaxy Tab A 8.0 (if you’ve downloaded TWRP.tar and SuperSU.zip)
- Extract Odin3_v3.12.7.zip on your desktop.
- Copy UPDATE-SuperSU-v2.76-20160630161323.zip to your device’s storage.
- Copy or move the TWRP file to the Odin folder.
- Boot your device into the Download mode:
- Power off your Tab.
- Now press the Volume Down, Home and Power buttons together until you see the warning screen, use the Power button to confirm and enter Download Mode.
- Connect the device to the PC using a USB cable. When your device is detected by Odin, the ID: COM port will be highlighted blue.
- Click the Options tab in Odin and uncheck the Auto-Reboot option. Do not touch any other thing in Odin.
- Now, click the AP button and add the TWRP.tar file to it.
- Then hit Start to flash the file.
- When TWRP is installed, you will get PASS! message in Odin.
- You can disconnect the USB cable now. (Note: If your Tab A is running Android Lollipop or Marshmallow firmware, continue with Step 11 right below. However, if your device is on Android Nougat, jump below to “Rooting Galaxy Tab A 8.0 on Android Nougat” section below.)
- You have installed a custom recovery but to gain root privilege you need to flash the SuperSU package too.
- Now reboot your Tab A into the recovery mode by holding the Home + Volume Down + Power keys at the same time. As soon as the screen goes blank, swap the Volume Down key with Volume Up while still holding the Home + Power buttons. Keep the keys press until you enter TWRP recovery.
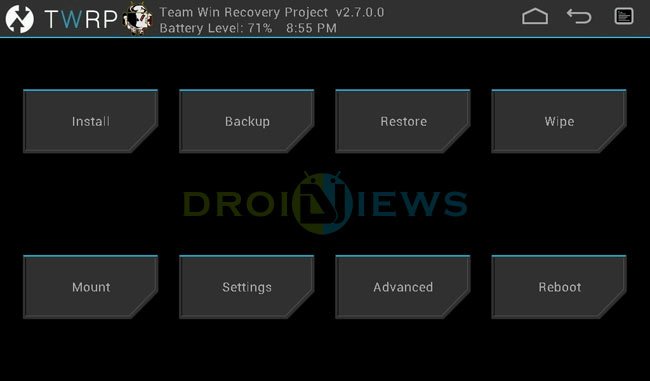
- Tap the Install button, locate the twrp_3.0.2-1_sm-xxx_mm_xx.tar file and select it.
- Swipe the installation confirmation slider button to install SuperaSU.
- When the file is installed, tap Reboot> System.
Wait until your Galaxy Tab A boots up. You now have root access and TWRP recovery installed on your device.
Root Galaxy Tab A 8.0 on Android Nougat
Downloads:
- Download the SystemMode SuperSU package file and copy the file to your device storage: Magisk-v15.3.zip
- Also download the no-verity file (only for Nougat firmware): no-verity-opt-encrypt-5.1.zip
Steps:
- After installing the TWRP file, when the phone is still in the download mode, press and hold the Volume Down + Home + Power buttons at the same time and immediately swap to Volume Up as soon as the screen goes blank/black while still pressing the Home and Power keys. Keep the 3 keys pressed until you get into TWRP Recovery.

- Now connect your Tab (while booted in TWRP mode) to your PC and transfer no-verity-opt-encrypt-5.0.zip and Magisk-v15.3.zip files using MTP mode (via USB cable).
- Go to the main menu in TWRP and select Wipe> Format Data. After that, go back and tap the Reboot> Recovery option.
- When TWRP boots up, tap the Install button and install no-verity-opt-encrypt-5.1.zip. (Note: If your Tab is running the Marshmallow firmware, you don’t need to install “no-verity-opt-encrypt-5.1.zip” and install Magisk directly. Flash the no-verity file only if your device is running Android Nougat firmware.
- When the file is installed select the wipe cache option and then select Reboot> Recovery again.
- Now tap the Install button, locate and select Magisk-v15.3.zip and install it.
- When Magisk is installed, select the Reboot> System option.
Done!
To verify root access on your Tab A, install and run the Root Checker app:
[googleplay url=”https://play.google.com/store/apps/details?id=com.joeykrim.rootcheck”/]
Falto el Mas necesario y básico de Nougat 7.1.1 de SM t-350 Odin http://www.mediafire.com/file/kj49s50n91g9bsy/recovery.tar.md5/file
y su Recovery Stock Odin http://www.mediafire.com/file/0g06qn2h713a8d6/Recovery_Stock_SG_Tab_A_8_smt-350.tar.md5/file
Flashify o Rash
http://www.mediafire.com/file/4wd8uhdj2woqeh7/recovery.img/file
De Nada…!!!
What happened to the supersu file?
Save it on the device’s storage or on the sd card?
When you wipe the data it will be lost, along with the no vetify, and magisk files if it was saved on the device’s storage…
Hi, you have to copy those files to an external SD card. In case you don’t use an external SD, connect your Tab to the PC after booting it into the TWRP mode after flashing the recovery and copy those files to your device. You can then flash them as directed.
İs it possible for androıd 7.1.1 t350
I am getting stuck on step 12. “Set Warranty Bit: recovery” pops up in yellow in the left corner and the Samsung logo is in the middle, but it freezes on the screen and nothing else happens. I cannot get past this step.
I have SM-T350 running android 7.0+. Used the twrp method and it worked only when I used Odin
3.10.7. Thanks man.
hello, is doing this worth it? is there any major cons?
Following marshmallow path for SM-T350 TabA, I am able to install TWRP onto the device using Odin 3.11.1 (which is the latest recommended for marsh), but when attempting to boot into recovery, device briefly shows “recovery” in upper left after I switch from vol down to vol up but then seems to turn off completely so recovery does not boot. The OS was 6.0.1 from the store and I did not do anything else. BTW, I tried repeating the odin TWRP download which seem to always work and shows PASS.
Please note that you have reboot into recovery without booting your device after TWRP is flashed. Did you do that? Which TWRP version did you download?
Try Odin 3.10.7 instead.
This guide worked great for me for my Tab A 8.0 with latest firmware, THANK YOU SO MUCH!!
Glad to know! 🙂
Anyone still looking for help with getting the Tab A to run after following the above guide?
i try “Root Galaxy Tab A 8.0 and Install TWRP (If you’ve downloaded the CF-Auto-Root file)” and successfully done until step 7 but my tab wont load….i just showing blinking samsung logo with black backgound :(…….im using the latest android (nougat)
Great guide, but my SM-T350 updated to Android 7.1.1 and it doesn’t work anymore. Any updated guide for nougat?
I didn’t transfer the SuperSU to my tablet before starting the root, and now I get the same as Mohd – Samsung logo blinking. Everything else worked fine. How do I transfer the SuperSU now?
Followed each steps carefully, however, once I have installed the twrp.tar and my tab will got to reboot mode. But then, the it remains at “SAMSUNG” logo, keeps blinking…
FYI, i have followed based on lollipop firmware. I am not sure am Lollipop or mashmallow..
flashed TWRP using Odin successfully but when i go into TWRP menu and tap Install it does not see the .tar file where i copied it to. i confirmed the file is there using Smart Switch and File Explorer. why does TWRP not see the .tar file ?
For some reason, I cannot get into TWRP recovery. My tablet can only get onto android recovery. Am I doing something wrong?
Flash the TWRP file again and make sure to disable Auto Reboot option in Odin. Once TWRP is installed try booting the device (directly from Download Mode) manually by using the hardware keys.
Ah, thank you. I must have misread that part of the instructions since it now works. I’m currently on the TWRP recovery trying to install, but I do not see the .tar file. I’m pretty sure I had that done right in Odin though. Unless I am doing something wrong again?
I realized that was my mistake since I didn’t read the instructions as well as I should have. It’s working properly now. Thank you!
Glad to know, Amanda! 🙂
i only see the CF-Auto-Root for Lollipop Firmware: sm-t350_p350_p355_cf-autoroot.tar. for lolipop were is the marshmellow 6.0.1 version ;p i’m using sm-t350 tablet
Here it is: https://www.androidfilehost.com/?fid=24591000424953305
ok i figured it out i didnt unclick auto reboot so it was screwing everything up but thank you!!! also it was confuse but i installed twerp first then super su
I followed this procedure and it appears my TWRP recovery is corrupted. When booting into recovery, I get a “Set Warranty Bit : recovery” in yellow at the top left corner along with the normal Samsung logo. I few seconds later the screen goes blank and it acts like it’s bricked. From there I have to go into download mode in order reboot. Rebooting without recovery will power up the tablet as it normally should. I’ve tried following the steps a few times to make sure I didn’t miss anything. I also tried a new version of TWRP that is recommended for my tablet from other guides. That does the same thing. I also tried a new version of ODIN, same thing. I’m afraid of bricking my tablet at this point so I have stopped trying different variations to get TWRP installed.
My tablet is a Galaxy Tab A T350 on Marshmallow 6.01. It was purchased new about a month ago. I did not update the firmware that was released back in March-2017. I believe the current firmware is from Oct-2016 so I don’t understand why this guide isn’t working for me.
I resolved my issue. Apparently my 1st download of TWRP 3.0.2 was corrupted. A fresh download and flash worked. TWRP 3.1.0, which was suggested by another guide, didn’t work as expected.
what was the guide
I rooted once I want to follow up on a new tablet and go cellular.
Can you be clearer, please!
I am not very great at this type of stuff, but it looks like a detailed guide. Question: will this work for SM-T357, which is T-mobile’s version of the SM-T350? Looks like I just don’t have the option to run marshmallow to it, but is it otherwise okay?
Is you tab running Lollipop?
I just picked it up last night and don’t have it in front of me so I’m not positive, but I think it is running Lollipop.
Then download this TWRP image: http://www.mediafire.com/file/w9u33fap6lk14pm/twrp-2.8.7.0-t357.tar
And install it as directed in the guide.
If I find out when I get home that it is running Marshmallow, is it still possible to root? And if you could, would rooting solve my issues I mentioned above about the sim card notification and tmobile software? Thanks so much.
The MM compatible TWRP is not available for your device model yet. Having rooted your Tab, you can try disabling the Phone apk found in /root/system/ directory. That might help but I haven’t tried that personally.
Thanks. I think I will try, but if I do not like the results, is there a step by step tutorial to revert back to the stock, pre-loaded software that is currently running?
Usually, getting stock firmware for Samsung devices are easy to get but I could not find any for your device model. 🙁
You are a great help. Thanks so much. Going back to a previous question, would I still be able to put the rooted Lollipop (as linked above) if my device currently is running Marshmallow, with the understanding that it will be a little stripped down OS? Or would that cause an issue with compatibility? Hope that makes sense.
Yes, you can downgrade to Lollipop and then root it using this tutorial.
I’m beginning the process but am a little confused. What do you mean in step #2: “Place the TWRP recovery and CF-Auto-Root files (.tar/.tar.md5) in the Odin folder.”
Do you want me to drag and drop these files into the extracted Odin windows folder or am I uploading it somewhere into the program such as in the picture you’ve included after step #6? Thanks for your help.
Install this app: https://play.google.com/store/apps/details?id=com.joeykrim.rootcheck
And run it to verify root.
I just did and it is rooted. Now to figure out what Samsung bloat ware I can remove safely. And then figure out what else I can do with it.
Check these out:
https://www.droidviews.com/list-of-50-best-apps-for-rooted-android-devices/
https://www.droidviews.com/list-of-bloatssystem-apps-on-samsung-galaxy-devices-that-can-be-safely-removed/
https://www.droidviews.com/list-of-galaxy-s6-and-s6-edge-bloat-apps-how-to-remove-them-without-root/
Hi,
I think your tab’s model number is ‘SM-T357T’. Please check it again.
Here’s the Lollipop firmware for your device:
http://updato.com/firmware-archive-select-model?record=5326451AE1A011E69215FA163EE8F90B
https://samsung-firmware.org/model/SM-T357T/
My main concern with rooting is to get rid of the “no sim card” notification and anything else T-mobile mobile related (I only intend to use wifi, but didn’t realize it was a cellular device). Will this even be my solution?
YES, it works! Be VERRRY careful to install the correct version xD. New at this stuff. I installed the lollipop version, when i should have installed the marshmallow version. Easy fix thanks to youtube and stockroms.
Glad to know!
This works 100% just not sure its full abilities yet. Just make sure you have the right files and you should be fine
Shanks for sharing your experience!
Anyone have any good/bad experiences with this procedure? I’ve run across a few similar to this that ended up requiring a stock recovery.