One of the fascinating things about Android is that it lets you unleash your adventurous self. If you are just a basic or average user, you could explore millions of apps in the Play Store to make the most of your device. However, if you are even a little passionate about the phone or tablet you own and have rooted it, the possibilities are immense. You can try and experiment custom ROMs and mods that can be easily found around the web if Googled.
Rooting lets you enjoy some really good apps and ROMs that help you get better battery life, the capability to tweak and optimize your device, and the option to customize your device in a plethora of ways. As you know, any adventurous feel involves the element of risks too. You might root your Android device, try a mod or kernel, or might go for a custom ROM, but there might be certain situation when you would either wish to return to the stock firmware of your device, or be forced to flash stock ROM as the ultimate resort to recover your device to normal state in case it is caught into bootloop.
The reason why I decided to write this tutorial is a little mishap that took place yesterday when I was going to install a ROM. I copied the ROM and Gapps file to phone, backed up the old ROM, and then while wiping data, cache, and system, I also selected internal SD card. The result was catastrophic and it was by flashing the factory image back that I could recover my Nexus 5.
While not all Android OEMs provide stock firmware of their device for public download, there are a few like Google and Motorola who have been pretty good at making them available to users. So, if you own a Nexus 5 and wish to restore it to stock firmware by flashing the official factory image, you can follow our detailed tutorial below and do it within minutes. Though this guide is meant for Nexus 5, it can be used on any Nexus device. The only important thing is, you must have the appropriate image file.
Disclaimer
The procedure described below has been well tested but its success depends on how good you are while following it. The method is pretty easy to follow but it involves a few ADB and Fastboot commands.Read all steps a couple of times, make all preparations and do them carefully.
Preparations:
- Download the latest Nexus 5 factory images from the official site.
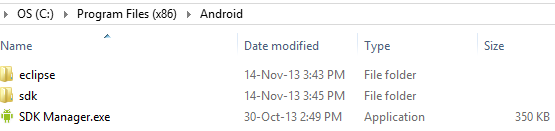
- Download and set up the Android SDK platform-tools on your computer. To do this, download the SDK zip and extract its contents to the following path: C:/Program Files/Android (create this folder first). If you use Windows 8, extract the SDK files to Program Files (x86). Then run the SDK Manager.exe as an administrator, check the Google USB Drivers and install it. Skip this step you have already done it.
- Enable USB Debugging option on your phone: Settings> Developer options> USB Debugging. If you do not find the developer options, you’ll have to make it visible manually.
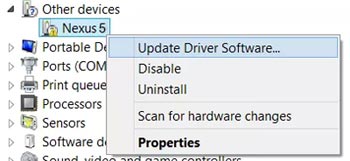
- Download and install the latest Google USB Driver on your Windows PC. Since the USB drivers is not an executable file but a zip, it requires special steps to install it. Download and extract the zip on your desktop. Connect your device to the computer. Press Windows+X keys on the keyboard and click on Device Manager option. Now click on the “Other Devices” expander button. Right click on Nexus 5 (with yellow triangle sign) and select “Update Driver Software”. Then click on “Browse My Computer for Driver Software”. Locate the “latest_usb_driver_windows” folder and select the Install option. When the driver is installed, your device should show in the device manager as “Android Composite ADB Interface”.
Restore Nexus 5 to Stock: The Steps
Having made the required preparations and downloaded the correct factory image for your Nexus 5, you can now proceed to flash it. Here are the steps to restore Nexus 5 to stock firmware:
- Unzip the downloaded factory image file with .tgz extension. Please note that downloaded with some browsers, the factory image file is saved to your computer as a .tar file. In that case, you should change the file extension to .tgz so that you might extract it.
- Open the extracted factory image folder. You would find a zip file inside. Unzip it too.
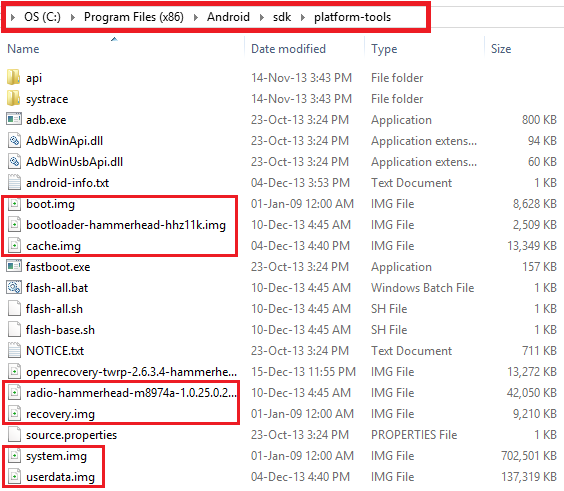
- Now copy all the contents of the image directory to the Platform-tools directory under C:/Program Files/Android/sdk.
- Also, copy the contents of the zip file to the same directory. See the screenshot below to get a clearer idea of the path of the files and also the image files that need to be flashed using fastboot commands.
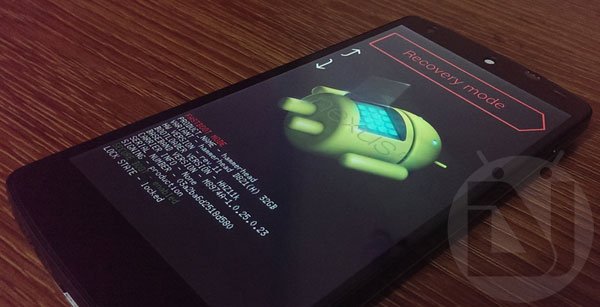
- Now it’s time to turn off your device and boot it into Bootloader/Fastboot mode. You can do it by holding the Volume Down+Power buttons for 2-3 seconds.
- Connect your Nexus 5 to the computer using a USB cable.
- Now open the platform-tools folder where you have copied the factory image files and launch a command window. You can do this by pressing the Shift+Right-click on the mouse at an empty space from within the platform-tools folder.
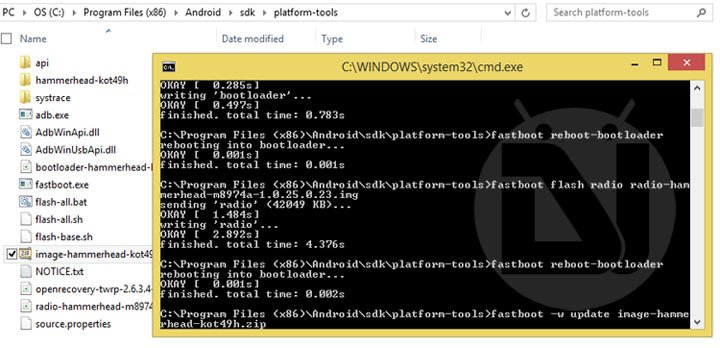
- It’s time now to begin the flashing business. Start typing the following commands one by one, allowing each to finish before moving onto the next. If you are a Mac user, make sure to add ./ in front of all commands (eg.- ./fastboot flash boot boot.img). Note: do not forget to replace the file names highlighted in red to replace with the ones that you have downloaded.
fastboot flash bootloader bootloader-hammerhead-hhz11k.imgfastboot reboot-bootloader
fastboot flash radio radio-hammerhead-m8974a-1.0.25.0.23.imgfastboot reboot-bootloader
fastboot flash system system.imgfastboot reboot-bootloader
fastboot flash userdata userdata.imgfastboot flash recovery recovery.imgfastboot flash boot boot.imgfastboot erase cache
fastboot flash cache cache.img - When the Nexus 5 factory images are installed to your phone, it will be on 100% stock firmware, like when you bought it. However, it’ll still have unlocked the bootloader. If you want to lock the bootloader again, issue the following command:
fastboot oem lock
- If you wish to keep your Nexus 5 with an unlocked bootloader, skip Step 9 and press the Power button on phone when its screen shows START.
Most Nexus factory images come with some flash scripts. By running them, you can easily install all the required files to your phone in a single hit. However, we still recommend that you use the fastboot command method given above. If you choose to use the flash scripts you can launch a command prompt window and issue the following command:
- flash-all.bat (for Windows)
- ./flash-all.sh (for Mac)
I hope everything goes right for you. In case you get stuck at a certain step or have a question, feel free to write a comment. Cheers!
Your 32GB Nexus 5 now shows only 16GB storage? Follow our tutorial to fix the issue.
Hi I just wanted to say thank you so much! I have the 16gb model and I have messed around with roms and rooting. All in all, I had 10.5 gb of nothing in my storage resulting in only getting 1.5 gb of free storage (because android took about 3.5 gb for software) It had made me so mad for a while because factory resets wouldnt even solve it. This is the only way that solved it for me. Thank you again!
-Luke
Hi, can you give me the link to the firmware image you flashed?
Hi Rakesh,
I am also getting write failure error via fastboot command and its for every image in Nexus 5 with 6.0.1 version.
Thanks,
Karmendra
Hi,
I have a question: after I flash a custom ROM can I flash the radio.img from the stock google image?
Yes. Most custom ROMs modify system only.
10x
Hi Rakesh, thanks for posting this. However, I am stuck at : “Download and setup Android SDK on your computer”. I followed your link and it brought me to the Android Studio bundle donwload page. I downloaded Standalone SDK Tools v24.2 (latest), unzipped it, but it does not contain either “eclipse” or “sdk” folder (pls see attached). May I know which SDK Tools version should I use? Appreciate your response.
Looks like the SDK file has not been extracted properly as it lacks the required files.
Download the attached “platform-tools.zip” and extract it to the same directory as shown in your screenshot: https://dl.dropboxusercontent.com/u/84115590/platform-tools.zip
or you can simply use the minimal ADB and Fastboot tools: https://dl.dropboxusercontent.com/u/84115590/mfastboot-v2.zip
Worked beautifully! I’ve been sitting on the lollipop dev preview for far too long. Most apps skipped over support for it, so it was high time to jump onto the real-deal. Thanks for your simple instructions! I’m bookmarking this for future updates!
Thanks for the appreciation, Michael!
Just followed all the steps using the most current build i could find and it worked a treat! Thank you so much! – April 2015
Glad to know!
hello i did the steps but my phone is still stuck on boot animation please help ASAP
Hold the volume down+Power buttons for a few seconds until you get into the bootloader mode. Then select recovery and wipe data factory reset.
or
Just flash the firmware again after a full wipe.
Tutorial: https://www.droidviews.com/your-32gb-nexus-5-now-shows-only-16gb-here-is-how-to-fix-it/
Hi (again) How do I just lock the bootloader? With a non-rooted phone?
Use this command: fastboot oem lock
Hello,
At the time I bought my Nexus 5 I ROOT it. It was then android kitkat. In the next update (manually initiated), the root disepeared and, as I didn’t need it anymore,
it did not bother me. With the next updates and especially lollipop these update were done automatically.
I am now on Android 5.0.1 and there is an android update worries because my bootloader is aleready unlocked.
My concern is this: I would like to re-lock the bootloader without losing all the data on my smartphone.
However, as the Nexus is no longer ROOTED, I do not have access to hidden data in the root, so I cannot save …
Do you have a solution for me that works here? The fastboot not going to erase everything?
Well I’m not very good so speak slowly 😉
Thank you in advance
PS: Oh, just one thing, the ADB drivers are already installed and “OK” (made at the root but still ok today), and, strange to say, as my Nexus 5 is no longer ROOTED,
when I start in fastboot, it makes me:
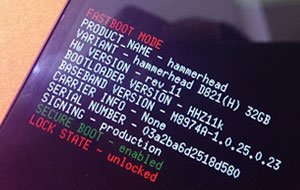
Poduct NAME: Hammerhead
VARIANT hammerhead D821 (E) 32Gb
HW Version – rev11
Bootloader version -HHZ11k
Baseband version – M8974A-2.0.50.2.22
So it’s the same (except baseband version) as the picture shown in the tuto. The question are: have I the corect firmware? In the “android-inf.txt” file ity says
“require version-bootloader=HHZ12d…argh! it’s not my version…
HELPPP!!!
Well, unlocking and re-locking the bootloader would wipe phone’s data. Better take a backup of your apps and other data before proceeding.
Ok thanks,
But with the specs I wrote, do you think that if I just re-lock bootloader, it will be as a native firmware? Or is it better to flash it entierely?
Since your device has the stock firmware, yes.
cool thanks a lot for replies and reactivity
Try flashing the images individually.
or
Try wiping data/factroy reset in stock recovery:
Press and hold Volume Down and Power buttons all at the same time.
– don’t release the buttons.
Uelease the buttons only when the Fastboot / Bootloader Mode options appear.
– a START text is listed at the upper part of your device’s screen,
Use the Volume buttons to change START to Recovery Mode option.
Press the Power button to select Recovery Mode.
– after that you will see an Android robot tilted and showing a red warning sign.
Now, you need to press and hold POWER, and then press once the Volume Up button.
The Stock Recovery Mode options will now appear on your device.
Now select “wipe data/factory reset” option and perform a wipe.
Then reboot the device.
After wiping data/factory reset, everything is wright. Thank you for your help !
Glad to know! 🙂
Hi…..i know it’s been 2 years since this were posted. I have same issue, stuck in Google logo for hours. Had done your guidance to re-flash and wipe data, but it still stuck at Google logo. Anyway, i use Nexus 5X….. Please help 🙁
I’m in the same situation right now. And i have no idea what to do. Possibly did every way to reset to stock. ADB , Root tool kit and what not. Always Failed Flash write error turns up. Anybody in here think it can be a hardware kind of issue?
Do you have an unlocked bootloader?
Yes. Now the phone’s in Bootloop :/
Then try flashing the images again. Show me the screenshot.
I did try again. Doesn’t switch on. Stuck at Google and with unlocked figure shown.
As far as the screenshot is concerned, its the same error being shown as what Kamrul Hasan had uploaded in the previous comment.
I did try to format the Cache and System , hard reset through stock recovery , but it didnt succeed. Shows failed.
Can’t try a custom rom because its not rooted and no recovery is installed..
As far as stock, I did try both the versions of Lollipop and 4.4.4. Still the same error turns up.
Here’s the command window 🙂
Hmm, so the device does not let flash any of the images, or the issue occurs only with the bootloader image?
It doesn’t let any of the images. I had referred it in other websites, I got comments saying my eMMc has got fried or something.
I doubt that too. That’s why I asked my previous question. Anyway, if any of the images were not flashed on the device, you should be able to boot the device normally.
Since EMMC is corrupt, it’s not letting any files to be written on the device, resulting in error.
https://www.droidviews.com/fix-e-cant-mount-sd-card-issue-android-devices/
Link you’ve given, for that my phone’s USB debugging should be on. But it isn’t and i have no Recovery installed and i cant install too cos phone isnt’t rooted.
So, you did not enable USB debugging before attempting firmware flashing?
I did. But now it says Enable USB Debugging
Contact us on Hangouts: djsaggi93@gmail.com
Adding screenshot
Hello Kamrul, first of all you need to make sure that you’ve Nexus 5 bootloader unlocked.
Something here I would like to know is that whether you’re trying to flash the latest lollipop factory image?
Hi,
My phone is currently bricked state. Since its not booting up, its not getting as ADB device. Yes bootloader unlocked and i am trying to flash lollipop image.
I am getting this error FAILED in both bootloader and radio. Please help me it’s urgent
THANK YOU
Hi Rakesh,
Thanks a lot for the detailed post. I have a basic doubt, Will i be getting the OTA updates as usual once i move back to stock android ? or do i need to flash it manually every time when there is a new update ?
Yes, having flashed the stock factory images, you will get all OTAs automatically.
I need some help, please.
this app can’t run on your pc windows 8 to find a version for your pc
Which app?
When I open Command Prompt and write fastboot devices, I see a warning “this app can’t run on your pc”. I using Win 10 technical review.
Try on Windows 8.
found the problem
forgot to add .img
Hmm. I was just wondering what could be the reason. 🙂
same thing with radio
cannot load ‘bootloader-hammerhead-hhz11k’
i did replace the names highlighted in red
the other problem I have also, is that all the places I’ve tried to download Android ver.4.1.2(for SGS3_GT-I9300 XXEMC2) from is linked to HotFile account(S) & I understand they no longer exist(were bought by a predator co.) are you not able to provide a link where, we are able to download from your server pls? In U.K.Thank you for your insightful website info!
hi Rakesh; this Tutorial is no good for myself & others when SGS3 does not get past ‘bootloop,’ to allow entry to switch on the ‘USB Debugging?’
hello, i’m very desperate and heartbroken- wanted to see if anyone could help me… i sent my nexus 5 to lg to fix the screen and they wiped everything without telling me, i’m pretty sure my phone wasn’t backed up since i had no idea they would do such a thing without informing me. Is there any way i can get at least my pictures and notes back? thank you so much !
You have no idea how much you help me, thank you very much 🙂
Glad to know we could help you!
Thank you sooooo much!! This has really saved my life!!!
Life is much more valuable than a phone, bro!
I have very sentimental photos of the last days of my dying mother’s life surrounded by her kids, grand kids and great grand kids stored on my Nexus 5. The phone is stuck in boot loop, won’t respond to hard factory reset, and my photos weren’t backed up. If I follow the instructions outlined here, am I going to lose the photos on my photos? In advance, thanks for your help!
Hi Cheri, you have made a big mistake by relying on a phone with no external storage for storing your important pictures and data.
Anyway, try the Nexus 5 Tool to install the factory images.
Nexus Root Tool: http://www.wugfresh.com/nrt/
Also download the factory images.
Open Nexus Tool, go to the Options and head over to the Flash Stock tab and tick the box next to Enable “No Wipe Mode”. This will prevent the stock images from wiping your data.
Next, it is important to install the proper drivers which can be done in the Initial Setup menu. Simply follow the the steps and you should be good to go soon. You are now able to flash Android 4.4.4.
Click the Flash Stock + Unroot button while having Device is on/Normal status checked. On the next screen select “Other/Browse ..” and “I downloaded a factory image myself that I would like to use instead”. In the next window you’ll be able to select the Android factory images you downloaded earlier.
If the program asks for an MD5 number, take the correct one from Google’s factory image page. The next steps will guide you through the process and you should be done quite soon. Your Android device is now running Android 4.4.4. However, your device is not rooted anymore and does not have a custom recovery installed. Head over to step 4 to fix that.
Rakesh, thank you so much for the detailed instruction. I’m anxious to get home and try this. There’s a long story about the history of the phone and why it wasn’t set to Google+ Auto Backup back up, but I’ll spare you details. 🙂
You can also try flashing only the boot, recovery and system images.
This worked for me. I got a little confused because I couldn’t find the SDK folder, but I eventually found it inside the adt-bundle folder… once I moved it up one level to the Android folder, all else worked perfectly. Thanks!
Great! Thanks for sharing your experience!
You have written a wonderful tutorial! I was able to follow each step with ease and I am now back to stock, and I thank you for that.
There was only one moment where I felt lost and I feel I should explain in case anyone else runs into this…
When connecting my Nexus 5 to my PC(Windows 7 64bit) the device manager showed that it had already installed a driver of its own and my phone was showing up under “Mobile devises” as simply a “Nexus 5” (a quick check of the properties showed that it was using a Microsoft driver from 2006) and I could not for the life of me update the driver and get it to use the Google USB Driver.
It wasn’t until after I placed the phone into “Developer mode” that my PC would let me install the Google USB Driver.
So I would suggest re-arranging your tutorial to instruct users to “Enable USB Debugging” prior to downloading and installing the Google driver.
Cheers!
Hi Bobby, thanks for the appreciation and the suggestion. You pointed the right thing and I have made the changes you suggested.
Keep visiting!
Regards!
What if you have a locked bootloader
You can still flash the factory images.