
If you have already updated your Galaxy S9 or S9 Plus to the Android Pie-based OneUI, and have been looking for a way to flash TWRP and root your device on the new Android version, We got you covered. You can root Galaxy S9 on Android Pie (One UI) firmware by following the steps in this tutorial.
Samsung Galaxy S9 and S9 Plus are in an elite list of devices that have officially received their Android Pie updates. While updates are fun and bring new features, they also break root. This is definitely not a cause for concern for the majority of Android users but there is still a significant minority that likes to have complete access to their device via root. Now that they’ve had their Android Pie updates, let’s see how to root them on Android Pie.
Warning
The method described below is only meant for the Exynos variant of the Galaxy S9 [SM-G960F/FD/F-DS/N] and S9 Plus [SM-G965F/FD/N]. It will trip Knox, and thus void your warranty as well. Tripping Knox also means you will lose features like Samsung Pay and Secure folder as well as the ability to use some banking apps. There are workarounds, of course, but we won’t be discussing those here. Once Knox is tripped, the effects are permanent and unrooting will not help. Furthermore, OTA updates will also stop working. The process also requires that your device be formatted so make sure you have a backup of everything important, even files on the internal storage.
Do not try this with any of the Snapdragon variants, unless you really want to risk bricking it. Rooting your device is always risky, even if you do have the Exynos variants that this method works on. Nobody can guarantee that you’d follow the instructions exactly, or that things will always happen as expected even if you do. You must take responsibility for the risk that you’re taking. DroidViews cannot be held responsible for any damage to your device.
Compatibility
- Samsung Galaxy S9
- Compatible: Exynos variants (codename: starlte) with model number SM-G960F/FD/N/X are supported.
- Not Compatible: Snapdragon variants (codename: starqlte) with model number SM-G960U/U1/W/0/2/8/SC are not supported.
- Samsung Galaxy S9 Plus
- Compatible: Exynos variants (codename: star2lte) with model number SM-G965F/FD/N/X are supported.
- Not Compatible: Snapdragon variants (codename: star2qlte) with model number SM-G965U/U1/W/0/2/8/SC are not supported.
Requirements
- Rooting the Galaxy S9 and S9 Plus would be a three-step process and would require the use of Odin, and thus, a Windows PC.
- The bootloader on your Galaxy S9/S9 Plus should be unlocked.
- Enable USB debugging and OEM unlock from the Developer options.
- Make sure the latest Samsung USB Drivers are installed on your PC.
- External microSD card or USB OTG.
- Ensure that your phone has at least 50% battery left.
Downloads
- TWRP Recovery for Galaxy S9 (starlte): twrp-3.2.3-0-starlte.img.tar
- TWRP Recovery for Galaxy S9 Plus (star2lte): twrp-3.2.3-0-star2lte.img.tar
- No-verity Disabler ZIP: no-verity-opt-encrypt-samsung-1.0.zip
- ElementalX kernel for Galaxy S9/S9 Plus: ElementalX-S9-2.01.zip
- SuperSU: SR5-SuperSU-v2.82-SR5-20171001224502.zip
- Magisk: Magisk-v18.0.zip
Install TWRP on Samsung Galaxy S9 and S9 Plus
- Turn off your Samsung Galaxy device.
- Press and hold the Volume down + Bixby + Power buttons together until you see text on the screen. Press Volume up here to enter Download mode.
- Launch Odin on your PC. If you don’t already have it, download it from the link provided above and extract the zip.
- Connect your device to the PC with a USB cable. You will see Odin display Added!! when your device is detected. The ID:COM Port should also turn blue. If this does not happen, you may need to check your USB drivers or the cable.
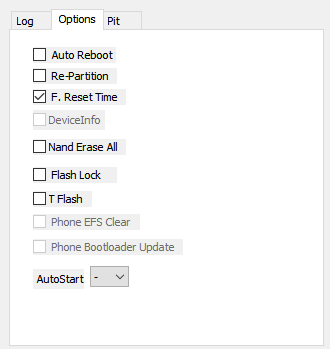
- On Odin disable everything but F.Reset Time under the Options tab. Especially make sure that Auto Reboot is not selected.
- Click on the AP button and select the downloaded TWRP image file: twrp-3.2.3-0-starlte.img.tar (for the Galaxy S9) or twrp-3.2.3-0-star2lte.img.tar (for the Galaxy S9 Plus).

Selecting TWRP image file in Odin Galaxy S9 Plus - Click Start at the bottom. When the process is complete, you will see a PASS! message displayed on Odin.
Your phone won’t reboot automatically since we disable the Auto Reboot option. So now follow the instruction given below to root it and do not reboot it yet.
Root Galaxy S9 and S9 Plus on Android Pie
- Disconnect your device from the PC and press and hold the Volume down and Power buttons together. As soon as your device turns off, press and hold Volume up + Bixby + Power buttons to boot your device into TWRP recovery.
- When asked to Swipe to Allow Modifications, don’t. Instead, tap on the Keep Read Only button.
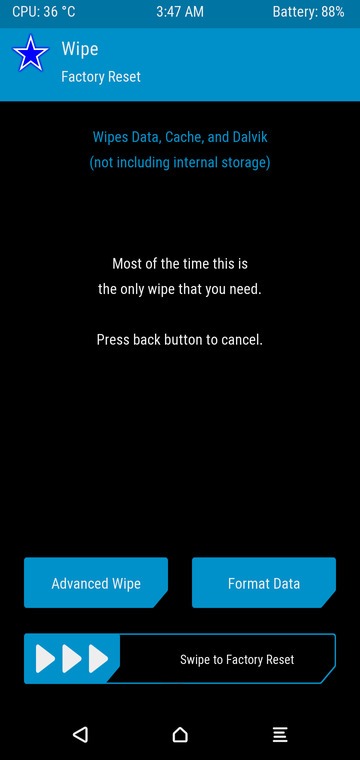
- Next, select Wipe from the TWRP main menu, then select Format Data and type yes.
- Go back to the TWRP menu and select Mount > Enable MTP.
- Download the No-Verity disabler, SuperSU/Magisk, and ElementalX-S9-2.01.zip and transfer them to your device using the MTP connection. You can also transfer them to an external microSD card or USB OTG and then insert the microSD card or USB OTG into your Galaxy phone.
- From the TWRP menu select Install, and select the no-verity-opt-encrypt-samsung-1.0.zip to disable encryption.
- Next, go back to the main menu and install the ElementalX kernel zip (ElementalX-S9-2.01.zip) similarly. The kernel is needed so as to keep the security of the firmware intact or you may not be able to use your Samsung account, fingerprint, Iris scan, Face unlock, and other related features.
- Similarly, now flash the Magisk-v18.0.zip file. You can also tap Add more ZIPs after selecting the No-verity zip file to add the kernel and magisk zips and flash them all at once. It is important that you select them in the right order.
- Once everything is flashed, tap on the Reboot system button that appears at the bottom.
You should find the Magisk Manager app in your app drawer when your device reboots. In the off chance that you don’t, just install the APK and it should work.


Hi,
I just followed all the setups correctly with caution but unfortunately, it is not working, now I did flash again the stock ROM but some features like Samsung services not working e.g. Samsung pass etc. I can’t even log in anymore to Samsung account it’s saying process failed
Does any solution please?
Hi, what error did you encounter during the procedure?