The Android Lollipop update should be rolled out to the Nexus devices a couple of weeks back but unfortunately, Google engineers were stuck in a pothole with the weird WiFi bug. A week ago LG announced the OTA updates for LG G3 in the current week and recently Motorola started rolling out the Lollipop update to Moto X and Moto G devices. All the while the Nexus fanboys are like “Hey! we’re supposed to get the Lollipop update first.”
Finally, the folks at Mountain View started pushing the Lollipop update to the Nexus devices gradually. The OTA notifications started rocking the notification bar and the Nexus users are excited to see the new update on their beloved devices. However, the OTA updates are being released gradually, so some of the Nexus users still might not see the OTA notification. Luckily for them, Google has uploaded the factory images for a few of the Nexus devices.
The factory images can be easily flashed using the automated script files provided in the package itself but few of the users were facing the error: update package missing system.img error while flashing. This error was not new but most Nexus users were disappointed with it, but don’t lose hope yet. In this guide, we will show a workaround on how to install the Nexus factory images manually using the fastboot commands.
Warning
This guide is intended only for the Nexus devices. Be extra cautious when you choose the factory images as flashing wrong ones might result in a bricked device. You alone are responsible for any consequences that might occur during the process, we shall not be held responsible for any damage to your device.
Preparations
- Charge your Nexus device above 60% battery level to avoid shutdowns during the process.
- Backup your device storage, Contacts, SMS, etc. using Google Sync service or any third-party app as the entire device will be wiped clean.
- Download and install the latest Google USB drivers on your PC.
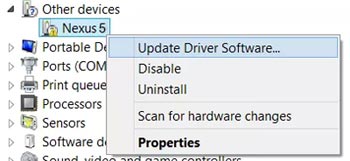
- Since the USB driver does not come as an executable file but a zip, it requires special steps to install it. Download and extract the zip on your desktop. Connect your device to computer. Press Windows+X keys on the keyboard and click on Device Manager option. Now click on the “Other Devices” expander button. Right click on Nexus 5 (with yellow triangle sign) and select “Update Driver Software”. Then click on “Browse My Computer for Driver Software”. Locate the “latest_usb_driver_windows” folder and select Install option. When the driver is installed, your device should show in the device manager as“Android Composite ADB Interface”.
- Since the USB driver does not come as an executable file but a zip, it requires special steps to install it. Download and extract the zip on your desktop. Connect your device to computer. Press Windows+X keys on the keyboard and click on Device Manager option. Now click on the “Other Devices” expander button. Right click on Nexus 5 (with yellow triangle sign) and select “Update Driver Software”. Then click on “Browse My Computer for Driver Software”. Locate the “latest_usb_driver_windows” folder and select Install option. When the driver is installed, your device should show in the device manager as“Android Composite ADB Interface”.
- Enable USB Debugging on your Nexus.
- Unlock bootloader on your Nexus device.
- Make sure to have a complete backup of the device as the entire device will be wiped clean.
Downloads
- Download and setup Android-SDK on your computer, or simply download the Minimal ADB and Fastboot tool: adb-and-fastboot.zip
- Download the stock factory image from the Google Developers page.
Flashing Factory Images in One Click (Win, Mac, Linux)
All Nexus firmwares come with a batch file for one-click installation. Here’s how to install firmwares using this method.
- Extract the firmware file and open it.
- You’ll find the following files inside the extracted folder:
- Now connect your device to the computer and run the flash-all.bat (Windows) or flash-all.sh (Mac and Linux).
- A command window will launch.
- Just follow the on-screen instructions and the firmware will be flashed to your Nexus device.
In case you are having “error: update package missing system.img” or any other issue while flashing the firmware using the above method, jump to the manual way to install the factory image manually.
Install Factory Images on Nexus Devices (Win only)
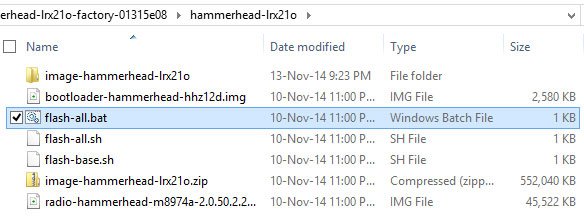
- The factory image will be in a .tar package. Change its extension to .tgz and extract it. You’ll get a bunch of files along with a zip file with the name image-xxx-xxx.zip. Extract it to find the following files:
- Extract the zip in the adb folder where you extracted the tar file. You will get the following image files:
- boot.img
- cache.img
- recovery.img
- system.img
- userdata.img
- Now copy all .img files found in the firmware package into platform-tools folder (if you have installed Android SDK) or into the adb-and-fastboot folder (in case you downloaded the Minimal ADB and Fastboot tool). Just for the sake of convenience, rename the bootloader and radio file as “bootloader.img” and “radio.img”.

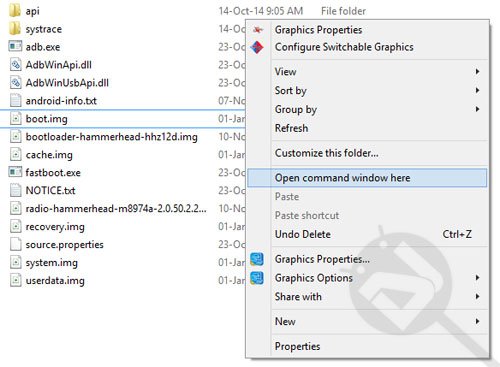
- While the platform-tools or the adb-and-fastboot folder is still open, press Shift key and then Right click on the mouse at an empty space inside the folder and then select Open command window here option from the Windows context menu.
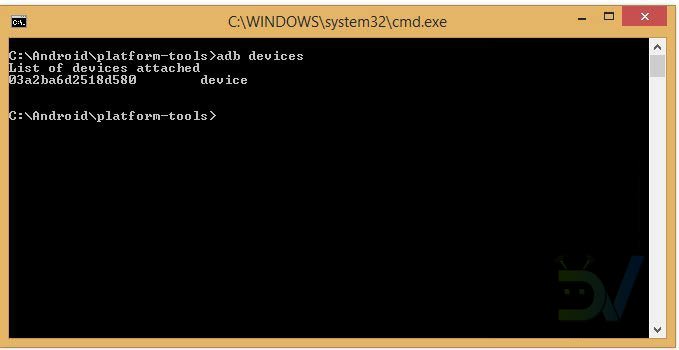
- Connect your Nexus device to the PC using a USB cable with USB debugging enabled in the settings. Just to make sure that your Nexus device is properly connected to the computer type the following command in the command window and hit the Enter key:
adb devices
- If you see the serial number of your device on the cmd window, you are good to go. In case you do not get any result, try reinstalling the USB drivers.
- Now reboot your device into bootloader mode by executing the following command in the command prompt:
adb reboot bootloader
- Once you get into the Bootloader Mode, you have to flash all .img files one by one using the commands described below. Let’s get started.
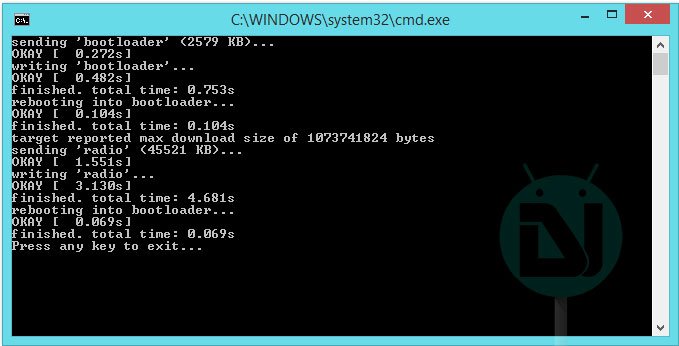
- Flash the bootloader that came with the factory image followed by the radio.img (radio.img is not found in all factory images, so don’t worry if it’s not present in your factory image)
fastboot flash bootloader bootloader.img
fastboot flash radio radio.img
Note: Make sure that the image file you’re flashing has the same name as in the folder. If the image name is different like bootloader-hammerhead-hhz12d.img, rename it to bootloader.img or change the command accordingly.
- Reboot the bootloader once you flashed the new bootloader and radio images. Don’t skip this step.
fastboot reboot-bootloader
- Once the device boots into new bootloader, flash the rest of the images one-by-one using the following commands:
fastboot flash recovery recovery.img
fastboot flash boot boot.img
fastboot flash system system.img
- If you want to do a full wipe of the device, issue the following commands one-by-one:
fastboot flash cache cache.img
fastboot flash userdata userdata.img
- The Nexus 9 factory image comes with an additional image file with the name vendor.img which stores the drivers. Flash it if you own a Nexus 9.
fastboot flash vendor vendor.img
- Once everything is done, reboot the device with the following command:
fastboot reboot
That’s it, your device will now boot to the world of material awesomeness. Be patient and excited at the same time.
Kindly let us know of your feedback regarding the tutorial in the comments section below.


Join The Discussion: