There’s a good news for the Galaxy Core users. If you own this device and are looking forward to root it, then this tutorial will certainly help you root and install TWRP on MetroPCS Galaxy Core SM-G360T1. Although this is unofficial TWRP built, it has been tested on this device and runs fine.
You need to install TWRP on your device using an Odin software designed for Samsung devices. WIth a custom recovery, you can install custom ROMS, custom kernels and even flash zip packages along with SuperSU package. Before you proceed, make sure you have the exact variant and device. This only works on SM-G360T1 variant of Galaxy Core. Other variants won’t work.
Warning: Rooting your device may void warranty. This will also trip KNOX. That means, you wont be able to install enterprise apps like Samsung Pay or update over OTA. We at DroidViews, are not responsible for any damage to your device whatsoever. We won’t be held responsible if you brick your device. Reader’s discretion is advised.
Requirements
- Make sure you have the perfect device and variant. This tutorial is suitable only for MetroPCS Galaxy Core SM-G360T1 variant.
- Make sure you have fully charged your Galaxy Note 5 or at least up to 60% of the battery.
- Enable USB Debugging on your phone.
- Make sure you have Samsung drivers installed on your PC.
Download Section
- Download | TWRP for MetroPCS Galaxy Core (File: Unofficial_TWRP_G360T1.tar.md5 (12.5 MB))
- Download | SuperSU-v2.46.zip
- Download | Odin3 v3.10.7
Backup Your Apps and Data
It is recommended that you backup your apps, contacts, messages, photos, videos and any other important data stored on the internal storage of your phone. Get some of our useful backup apps from the DroidViews archives. This will help you backup your device data easily. Once you install TWRP recovery onto your device, take a nandroid backup before you flash the SuperSU zip file.
How to Root and Install TWRP on MetroPCS Galaxy Core
- Download the TWRP and SuperSU files for your MetroPCS Galaxy Core.
- Transfer the SuperSU file to your phone’s internal storage. Transfer the TWRP file to your PC; if it is a zip file, extract it to get the file with .tar extension.
- Now turn off your phone and boot it into the Download Mode. To do this, turn off your device and then press and hold Volume Down + Home + Power buttons simultaneously for 2-3 seconds. When you see the warning screen with a yellow triangle sign, press the Volume Up/Down key to enter Download or Odin mode
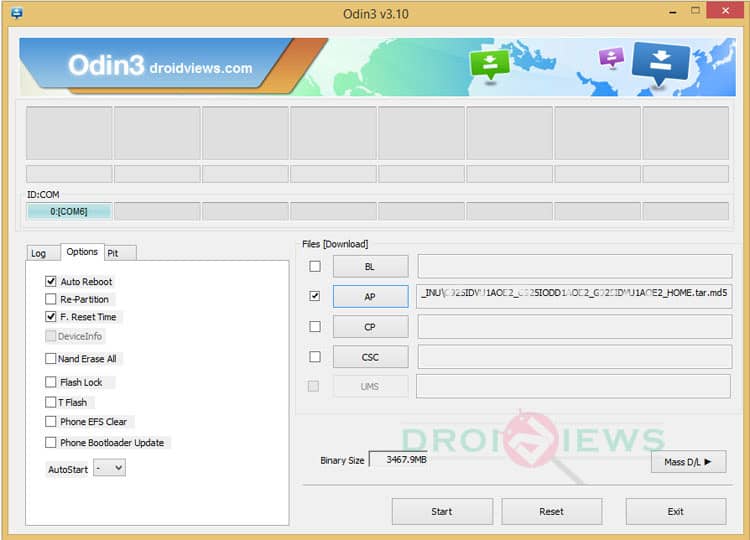
- Download the required Odin.zip file and extract the file on your PC. You will get the Odin3_v3.10.7.exe file. Open it as administrator to get to the Odin window.
- Connect your Galaxy Grand Prime to the computer using the USB cable.
- When you connect the device, the ID:COM port on Odin will turn Blue. You’ll also see“Added!!” message to indicate successful connection.
- In case your phone is not detected by Odin, you can try the following things:
- Reboot your phone and turn off USB Debugging and turn it on again.
- Try reinstalling the Samsung USB Drivers.
- Try changing the USB cable and connecting to other ports.
- Now click AP button on Odin and add the firmware file (TWRP_G360T1.tar.md5).
- In the Options section, make sure that only the Auto Reboot and F. Reset Time boxes are checked and everything else is unchecked. (Do not, in any case, check Re-Partition box)
- Now, click the Start button on Odin and the TWRP installation will begin which may take a few minutes.
- Once you get a PASS! message on Odin, your device will restart. It’s the green signal that indicates successful installation. In case you get Fail! message, make sure you have gone through the preparations carefully.
- Now detach the USB cable from your Galaxy Core and power off the phone.
- Now boot into the custom recovery. Power off your device and then press and hold the Volume Down+Home+Power buttons at the same time for a few seconds to boot into the TWRP recovery, that was just installed on your device.
- Tap the Install button in TWRP and navigate to SuperSU-v2.46.zip.
- Select it and confirm the swipe operation at the bottom, to flash the SuperSU package.
- When the installation is successful, reboot to system.
Once you successfully boot into the system, you can now enjoy root access and TWRP on your MetroPCS Galaxy Core. For any queries, comment down below.
No work..!
no wipe after intall.
1 flash recovery
2 enter recovery
3 factory settings only no wipe
4 install superuser
4 click on reboot system
no wipe after
It says pass every time but when I try and boot to recovery…it’s not there. It takes me right to the same screen as before…download mode or restart device. Any thoughts
unfortunately the author didn’t include any links to the original creator of this work, shame on him but if you google search: shinyside root sm-g360t1 you should find what you need.
shinyside is the actual maker of the TWRP and root above.
so i believer im doing everything right, i even get PASS, just when i restart i dont get it where exactly are we placing the super su ?
in the phone’s internal storage. That way when you boot into TWRP, you can select the file.
i get unsuccesfull even though i followed all steps
when do you get this unsuccessful message and what does that message read? Make sure you are connected properly. Download latest drivers.