
When Motorola was a part of Google, the company was known for affordable smartphones with more than decent specs for the time. Slowly, that market has been captured by Chinese OEMs and Lenovo owned Motorola had to move slightly upwards on the price bar. This year’s Moto X4 is a good example. The best part about a Motorola phone is perhaps it’s almost stock Android-like interface. That also means more reasons to root, for some people. If you’re one of those, there is a way to root the Moto X4 right now and install TWRP.
Motorola has been rolling out the Android 8.0 Oreo update already which brings many new features and performance improvements. Even though it should work, in theory, the rooting method mentioned below hasn’t yet been tested on Android Oreo. You can download and install the Moto X4 Android Oreo update from here.
Warning
All rooting methods, no matter how simple or successful are risky. As a general rule of thumb, don’t root your device if you can’t handle a few bugs and glitches that may or may not appear after rooting. Furthermore, rooting voids your device’s warranty so you won’t be able to take it to the service center for a free repair. The rooting method covered in this guide is riskier than usual because it hasn’t been tested a lot.
XDA member mightysween who came up with it claims to have tested it on his Moto X4 which is an XT-1900-1 running the NPW26.83-34-0-1 firmware. This is the official Android Nougat firmware from Motorola.
Some users have had success in achieving root with this method on other Moto X4 variants and software builds. On the other hand, some users have also reported not being able to factory reset their device after rooting. If you do decide to go ahead with this guide and root your Moto X4, make sure that you take responsibility in case things go south. DroidViews cannot be held responsible under any circumstances.
Requirement
- Your Moto X4 must have an unlocked bootloader.
- Install ADB and Fastboot on your PC.
- Windows users will also need to install Motorola USB drivers.
- Enable USB debugging and OEM unlock on your Moto X4.
Downloads
TWRP Recovery
(rename the file name to “twrp.img” before flashing it via fastboot)
SuperSU
- SuperSU 2.85 SR5 (download and transfer to an external SD card)
Install TWRP
This should be a piece of cake if you’ve done this before.
- Download the TWRP image file for Moto X4 from the link above and rename it to twrp.img.
- Move the twrp.img file to your adb installation folder.
- When the adb folder is opened, type cmd in the address bar and hit Enter to launch a command prompt window within the folder. Linux and Mac users can simply launch a Terminal to use adb.
- Once the ADB command interface is open, connect your Moto X4 to your PC. On your phone, you may be asked to grant USB Debugging permission to the PC. Allow it.
- Now use the following command to boot your phone in fastboot mode.
adb reboot fastboot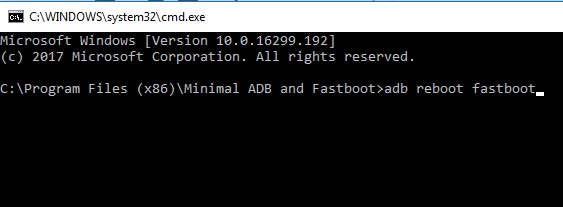
- Enter this command to flash the twrp image onto your device.
fastboot flash recovery twrp.img
- Once the flashing is complete, disconnect your phone from the PC.
- Use the Volume buttons to select Recovery and press the Power button to confirm.
Root Moto X4
- Once in the TWRP recovery, insert your external SD card that has the SuperSU zip file. In case you don’t have an SD card, just skip to the next step.
- Select Wipe > Format data and then type yes to format your device. This will clean all your apps, data and everything on your device’s internal storage. This step is necessary to remove encryption from the device’s internal storage.
- If you don’t have an external SD card you can now connect your phone to the PC with a USB cable and transfer the SuperSU zip file to the device’s internal storage.
- From the TWRP main menu, select Install and navigate to the SuperSU zip file.
- Select the SuperSU file and then swipe at the bottom to flash it.
- Once done, tap on the Reboot system button that appears.
Your device may boot several times before a successful boot, which is completely normal. When it does boot though you should find the SuperSU app in your app drawer. You should also see the option to encrypt your device in Settings > Security > Encryption, now that it is unencrypted.
source: xda
Join The Discussion: