Being updated on your devices can sometimes be a pain. Being the first to use a new OS means being the first to encounter bugs too. The same happened when we shifted from Windows 8 to 8.1 [for some users Windows 7 to 8]. The Nexus devices we had [Nexus 5, 6 and 7] were not connecting to the PC. The device did appear in the device manager and the Windows 8 list of known devices with its corresponding name but we weren’t able to do anything with it. File & Image transfers were not possible as it did not appear in Windows Explorer.
A Google search showed us that we were not the only ones and other Nexus models were also affected. Rest assured, we tracked the solution and have simplified it for avid readers of our blog.
Connect Nexus Devices on Windows 8.1
Do the following and your Nexus device should connect. If you still face problems, do leave comments below so that we get back to you. Screenshots attached for your reference.
- Check whether MTP is ON:
Go to settings > Storage> Options [top right] > USB Computer Connection. If it is not already ON, use the toggle switch [screenshot below]. This menu might only appear when the USB is plugged in on both the PC and the Nexus device. MTP stands for Media Transfer Protocol.

1- Storage 
2- USB Connection options - Device Drivers:
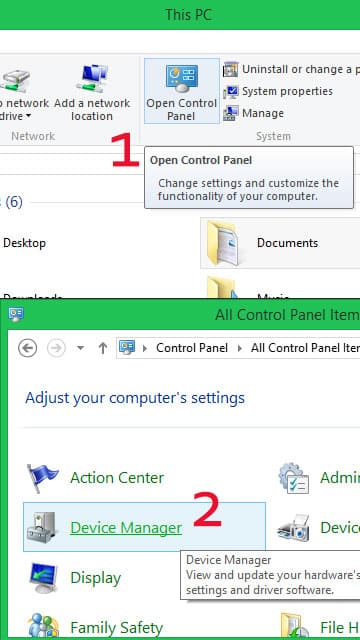
Open Device Manager on your PC after connecting your Nexus device. This can be done either by going through: My Computer > My PC > Control Panel [top bar] > Device Manager
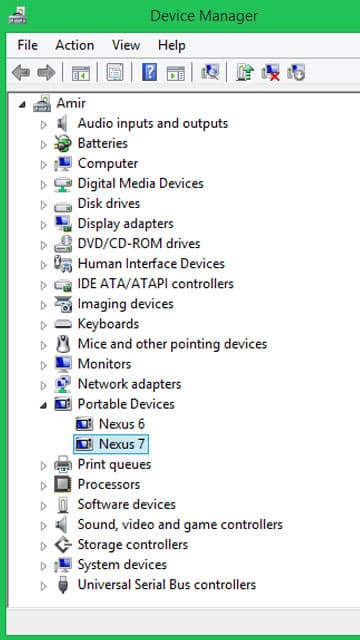
The device should be listed here as its generic name i.e. : Nexus 7. If you see something like Acer ADB Interface / LG ADB Interface; it means that the correct drivers have not been installed.
Resolve this by right-clicking the device and choose: Update Driver Software > Browse My Computer for Driver Software. There should be another compatible driver already available. Pick the ‘MTP USB Driver’ to replace the ADB Driver. - Rightly done and installed, the Device Manager should now list your device in the right manner. More importantly, you should now be able to sync and transfer files between your PC and Nexus device.

3- PC & Control Panel 
4- Device Manager


Note: If you cannot find the right drivers in your PC, please comment below. A separate post shall follow for commonly needed drivers for Nexus devices in case its a common issue.

Join The Discussion: