Nexus 9 is lucky enough to have received the Marshmallow update. The 9-inch phablet has managed to impress many users across the globe. Now with the latest Android version in its pocket, the device has become quite unbeatable compared to other tablets in its range.
A new build from Google is here with the build number MRA58N, based on the latest Android 6.0.0 Marshmallow. Nexus 5 is another device to have received a similar firmware update. The update brings many bug fixes and stability improvements.
However, if you have modified your stock firmware or have rooted your device, then there are chances that you may not receive the update over the air. In order to install the latest available firmware on your Nexus device and restore your device to stock, flashing factory image is the simplest option available. If you have installed a custom ROM then this will help you revert back to everything stock.
The listed factory images are for the WiFi and LTE variants of the Nexus 9. With this tutorial, you can flash almost any version of the factory image on your device. However, this procedure will wipe all your apps, data and restore everything to stock. Hence backup everything before you proceed.
Let’s begin with the tutorial.
Warning: We at DroidViews won’t be liable for any damage to your device whatsoever. A full backup is highly recommended. Reader’s discretion is advised.
Download Section
- Nexus 9 WiFi firmware MRA58N | Mirror Link
- Nexus 9 LTE firmware MRA58N | Mirror Link
- More Firmware for Nexus 9
Install Android 6.0 MRA58N Factory Image on Nexus 9
Prerequisites
- Set up ADB and Fastboot on your computer. You can download the full Android SDK Platform-tools for Windows Mac or Linux OS.
- Install Nexus USB Drivers on your computer.
- Open Settings> Developer options and enable USB Debugging on your device.
- Go to Developer options and enable Allow oem unlock, if this option is available.
Installation Instructions
- Download the factory image from above and transfer it to your PC.
- Make sure you have setup ADB and fastboot on your PC. Also, accept Always allow from this computer when you plug in the device for the first time to enable USB Debugging.
- Now power off your device and unplug it from your PC.
- Boot into the bootloader or fastboot mode. To do so, press and hold volume down/up and the power button simultaneously for 5-6 seconds. When you see the bootloader screen, connect your device to the PC using a USB cable.(Choose fastboot if the option is available) You can also issue the following code while connected to the PC, to boot into the bootloader.
adb reboot bootloader
- Now plug in your device to the PC and let the drivers install.
- Navigate to the location where you have placed the factory image file on PC and extract it to get files with .img.
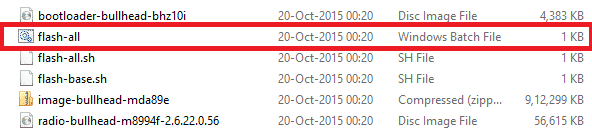
- While the folder with the extracted factory image is open, run the flash-all.bat file on Windows PC and confirm the flashing process. Wait for the process to complete. If you use Linux or Mac OS, run the flash-all.sh file and follow the instructions.
- Once done, reboot the device normally. Once you see the new boot logo, that means the system has successfully been installed.
First boot may take a while, so be patient. You may also need to unlock the bootloader on your Nexus 5. To do so, issue the command “fastboot oem unlock”. If you need to lock the bootloader, simply issue the command “fastboot oem lock“, while your device is connected.
Also See:
Download Stock Recovery for Nexus 9,7,6,5 and Player
For queries, comment down below. If we have helped you, then like and share us on social platforms. If you need help with other devices, let us know.


Join The Discussion: