USB OTG or On-the-Go was a concept brought up in the year 2001. It would let a mobile device to act as a host for external media like USB pen drive, keyboards, mouse or game controllers etc. It was later that Android smartphones also started to support USB OTG, which proved out to be an excellent asset for its users.
Well, the first impression that every Nexus 5 user forms when he/she connects an external drive using OTG cable is that the N5 doesn’t support USB OTG, which is solely wrong. It does support and have all the necessary modules built into its Kernel. What it lacks is a native app to initiate that process. Don’t take it otherwise, it’s not a drawback, you know it’s a Nexus and Nexus doesn’t come with any 3rd party goodies. We will provide our hand to pull you up from this complication and access your external drive, to view or edit data on-the-go.
If you’ve already read around, of which I’m sure you have, there will be a question raised – Does it require your Nexus 5 to be rooted? No it doesn’t because it is not a necessity. While earlier, apps like Stickmount etc. required root permissions, the process has now been simplified by this simple yet terrific app. Hence you can now make use of USB OTG support without Root permissions.
Things you will need
- A Nexus 5: rooted or unrooted
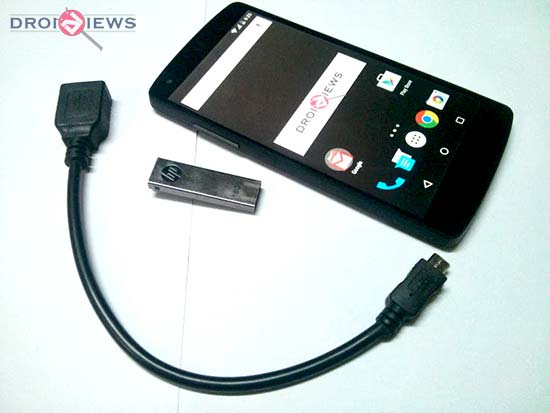
- Compatible USB OTG Cable with Type A USB port and a Micro-B port (could be bought online at Amazon, Ebay or from a local market near you)
- Pen Drive or Thumb Drive

How to use USB OTG on Nexus 5
- The foremost step is to download the required App – Nexus USB OTG File Manager (Free or Paid), from the app box at the end of this article.
- It’s time to grab your tools – The Nexus 5, Flash Drive and USB OTG cable
- Connect the Flash Drive to the Type-A USB side or the broad side, in simple language.
- Insert the Micro-B connector into the USB port of the Nexus 5.
- Once the connection has been made successfully, navigate to the app drawer and run the Nexus USB OTG File Manager app.
- In the app, the left tab belongs to the External Drive which will be connected and the right one supports the Internal Storage, in case you’re willing to copy some content from the internal storage to external drive, or vice-versa.
- Tap on Connect to start the connection between the drive and your smartphone.
- The app will mount the Flash/External Drive. It is now ready to be accessed, copy, delete, play or edit any of the content on your drive easily.
If you find the app worthy enough to be bought, click here to view the Google Play Store link.
It was easy, right? That’s what we’re here for, to straighten out things for you. Put back some feedback via comments, it will help us to write better.

Hi can you suggest me the OTG cable that supports for nexus device with link as there are various in online and don’t know exactly which one to buy??
Hi Arun, I purchased the Sandisk 32 GB USB OTG and it works with all my devices including the Nexus 5x, Galaxy S7 and HTC One M9.
Link please??
I have this one: http://www.amazon.in/SanDisk-Ultra-16GB-Micro-Drive/dp/B00HR7K7M0/ref=sr_1_77?s=computers&ie=UTF8&qid=1479406872&sr=1-77&keywords=usb+otg
You can also get this one: http://www.amazon.in/Storite-Micro-Flash-Samsung-Galaxy/dp/B00L8WCO76/ref=pd_sim_sbs_147_4?_encoding=UTF8&psc=1&refRID=10QRD6NAE07T2FE09ZGJ
So I’m already having 16 GB HP pen drive so which one would you suggest??
Go for the cable then.
Hi, when i see the port to connect to nexus 5 in the displayed picture the port of my nexus 5 device does not support it. My charging port is different from the port of the cable you shared. Can you share me any alternative link please for the nexus 5 device??
As I said earlier, I got the SanDisk OTG and it works on my old Nexus 5.
OMG thank you! I tried everything, ES File Manager did not work for me, NOTHING worked till I found this. Hit the connect button and viloa, I am playing my videos with VLC and listening to my music, verrrrrrrry happy bro !
Glad to know it helped you!
will it support otg pendrive without otg cable .plz ans quickly b,coz i m going to buy otg pendrive jagsavisim76@gmail.com
You’ll need I micro USB to USB cable unless you have a standard size USB port on your tablet or phone
Latest version (since V3.0) of ES File Manager supports OTG out of the box, i.e. rooted not needed.
it’s paid now