ZTE Axon 7 is one of the best mid-range phones available out there. The phone houses a Snapdragon 820, QHD screen resolution, 20MP rear and 8 MP front camera with a decent 3250 mAh battery enough to last a full day. I mean what else one can get in a 400$ price bracket. This phone is seriously nuts. Moreover, the front firing stereo speakers on the Axon serves as an icing on the cake.
Nevertheless, those were some brief specs mentioned out there. However, the main purpose of writing this post was not to talk about specs. So, let us do the things for which we are here. In this post, I will be describing in detail how you can unlock the bootloader, install TWRP and root on the device itself. Thanks to Tennear, Unjustified Dev, DrakenFX, and Starvirus of XDA. Without them, this post would not have been possible.
Install TWRP Recovery on ZTE Axon 7
Prerequisites
- Make sure your device is at least 60% charged
- Temporarily disable your antivirus program (To allow axon7tool to work)
- Backup important data to your PC (Basically from the Internal Storage)
- Download minimal fastboot and ADB tools (Unzip the files into ADB folder so that you can easily access it later)
- Download the axon7tool (Place the file in the ADB folder)
- Finally, download the TWRP image file (Place the image file in the ADB folder)
- Make a copy of the recovery.img file and rename it to recovery.bin (Do this in the ADB folder)
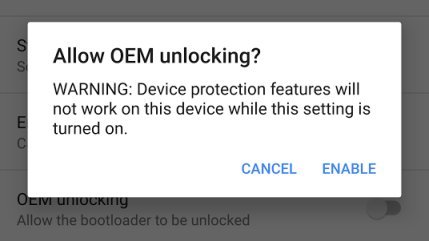
- Make sure USB Debugging and OEM Unlock are enabled (Settings» Developer Options)
Warning- This will void your warranty. We at DroidViews won’t be responsible for any type of data loss or damage you incur to your device. Please do some research before flashing or unlocking the bootloader. However, we ensure you that if you follow the steps correctly then you will land in no problems.
Steps to Install TWRP Recovery
- Connect your Axon 7 to the PC.
- Hold Shift + Right Click» Open command window here (Do this in the ADB folder).
- Type,
adb devices
and hit enter (A device will be listed by its code name).
- Then, type,
adb reboot edl
and hit enter (Your device will reboot into EDL mode. If it appears off then don’t worry. That is the nature of EDL mode).
- On your PC, navigate to Control Panel» Device Manager and check whether the device is listed as QUSB_BULK or not (If not then check the troubleshooting section below).
- After that, type in the command prompt
axon7tool -r gpt boot recovery
and hit enter (Your device will reboot).
- After the device has booted, type,
adb reboot edl
and hit enter.
- Now, verify if you have 3 backup files gpt, recovery and boot in the ADB folder.
- Then, in the command prompt type
axon7tool -w recovery
and hit enter.
- Wait for it to be executed and then your device should reboot.
- After the device reboots, power it off.
- Then, reboot into TWRP recovery (To do so hold both Power and Volume Up button until droid logo).
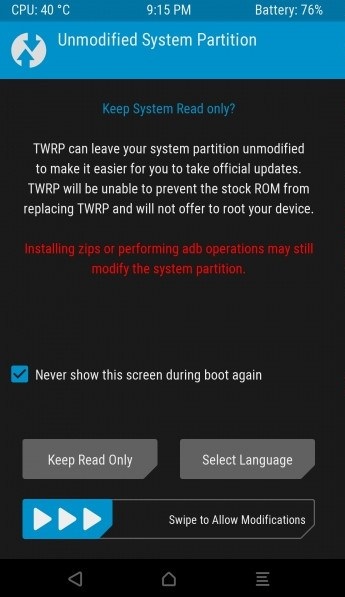
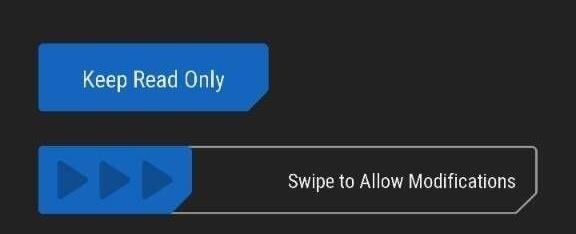
- After this, if the TWRP recovery asks for a password then, simply click on cancel.
- If asked to modify system settings then swipe to agree.
If you follow the steps correctly then you will have a working TWRP installed on your ZTE Axon 7.
Troubleshooting
- If your PC doesn’t recognize your device as QUSB_BULK then download Zadig and replace the drivers with WinUSB ones.
- If axon7tool.exe doesn’t recognize your device even after connecting the device as QUSB_BULK then try killing adb.exe via task manager before trying again.
Unlock the Bootloader on ZTE Axon 7
Prerequisites
- Make sure your device is at least 60% charged
- Download minimal fastboot and adb tools (Unzip the files into ADB folder so that you can easily access it later)
- Download the ZTE-Axon7-About-Image.zip (aboot.img) file and put in the ADB folder
- Finally, Download the TWRP_Unlock_Bootloader file (Unzip it but only copy the fastboot_unlock.img file to the ADB folder)
Steps to Unlock Bootloader
- Navigate to the ADB folder and hold Shift + Right Click» Open command window here.
- In the command window, type one command and hit enter. Do this for all of the commands listed. Type,
adb push aboot.img /sdcard/adb push fastboot_unlock.img /sdcard/adb shell dd if=/dev/block/bootdevice/by-name/fbop of=/sdcard/fbop_lock.imgadb shell dd if=/dev/block/bootdevice/by-name/aboot of=/sdcard/aboot_lock.imgadb pull /sdcard/fbop_lock.imgadb pull /sdcard/aboot_lock.imgadb shell dd if=/sdcard/fastboot_unlock.img of=/dev/block/bootdevice/by-name/fbopadb shell dd if=/sdcard/aboot.img of=/dev/block/bootdevice/by-name/aboot - Then, type,
adb reboot bootloader
and hit enter (The device will boot into bootloader).
- Finally, type,
fastboot oem unlock
and hit enter.
- Follow the instructions on the device in order to confirm unlocking of the bootloader (Use Volume Buttons to navigate and Power Button to select).
- Boot into TWRP recovery (To do so hold both Power and Volume Up button until you see the droid logo).
- At the end, Navigate to Wipe» Format Data and type in Yes to confirm data formatting.
Note- If you a permission denied issue then try doing these steps while in TWRP recovery.
Root ZTE Axon 7 (A2017G)
Prerequisites
- Download the SuperSU 2.79.zip file (Transfer the zip file to the device’s Internal Storage).
Steps to Root
- Reboot your device into TWRP recovery mode (To do so hold both Power and Volume Up button until droid logo).
- Click on Install.
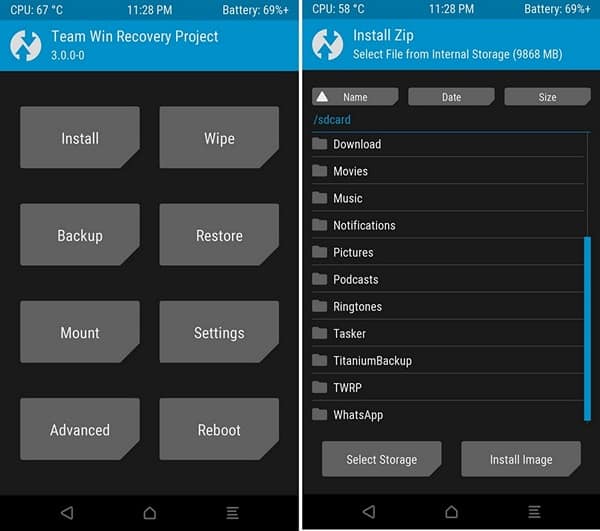
- Then, navigate to the directory where you placed the SuperSU.zip file.
- Click on it and swipe right to flash it.
- After completed, reboot your device to the system.
Download Root Checker from the Play Store to verify root access.
[googleplay url=”https://play.google.com/store/apps/details?id=com.joeykrim.rootcheck”/]That is it, guys. This is sure a long post and I know some beginners will face issues with this. For them, remember the comments section is always below to ask for help. We will try to reply as quickly as possible.
hello
my device after this step
6. After that, type in the command prompt
didnt reboot. and now the phone is not working. what can i do
Hi, did you try pressing and holding the power button for a long time?
Hello oys,
Would you be so kind to hast this TWRP v3.0.2-2?
I can’t find it anywhere.
Sorry but I don’t have that version anymore, and it looks like they took down the link in the original thread. You might have to head over to the thread and ask them about this. There’s a toolkit that I have never tried before but may work in this thread https://forum.xda-developers.com/axon-7/development/tool-axon7toolkit-t3573108. But again, I’ve never tried that toolkit before so I really don’t know for sure if it’ll help.
Anyone rooted A2017G with B06 or B08?
Anyone know, how to root A2017G with B06 or B08?
Great to hear that. The comments were awaiting moderation that is why you didn’t receive them. I know the whole process sucks. Looks like you flashed the stock firmware. Did you flash the SuperSU [zip] after flashing the stock firmware? What version are you running B08, B09 etc.? I would also suggest to crosscheck for SuperSU app, sometimes it is shown in the settings menu.
everything works now, unlocked bl, root and stock firmaware 7.0 TY
It looks like this thread is dying, but I will tell anyone on A2017G 7.1.1 This method will not work to unlock the bootloader, making all other points mute.
You can’t have a A2017G with Android 7.1 (Daydream support) and root. You have to pick either root or 7.1, can’t have both.
I hope this saves you time. I will follow progress and remove this post if that ever changes.
Yes, the thread is indeed dying. At the time of writing this post I tried the method on the device (Android 7.0). It was working then. I don’t have the device now so I’m unable to help other users out there.
Anyways thanks for the heads up. If I get the device then I will check the whole process again and make necessary changes.
after I opened twrp and try to reboot I am stuck at the ZTE logo, nothing happens after that. I can only boot into twrp now
I would suggest that you should flash the stock factory image to revert back to stock. However, if you want a custom ROM on your device then there are a few good ones available at XDA which are worth checking out.
does that work without an unlocked bootloader? So, im talking about the stock rom, and where can you find on and how to flash it??
You have TWRP installed, right? This means you have unlocked bootloader. I think you haven’t tried format data yet.
Follow these steps:
1. Boot into TWRP recovery.
2. Click on Wipe» Format Data.
3. Type yes and swipe to confirm.
After the above process is complete, try to boot into System again and wait. If the device boots then hooray you did it. In case you don’t have any luck then let me know I will forward you the link to stock recovery images.
But I only installed twrp, I didnt do this yet “Steps to Unlock Bootloader
Navigate to the ADB folder and hold Shift + Right Click» Open command window here.
In the command window, type one command and hit enter. Do this for all of the commands listed. Type,….. etc.”
So now what?? What do you want to do?
Well, I just want my phone back working as usual (idc about my data now) OR a working phone with root (preferably a stock rom)
Honestly, I don’t think so. I would say follow these steps:
1. Boot into TWRP recovery.
2. Click on Wipe» Format Data.
3. Type yes and swipe to confirm.
Wait for the process to complete then try to boot into the System. Did this do the trick??
Okay, nvm, I just followed his steps and formatted the data and rebootet the phone after I unlocked the bootloader and now this message appears: “your device software cant be checked for corruption, please lock the bootloader. Visit this link on another device (link doesnt work, 404 error).
If no key pressed: Your device will reboot in 5 seconds”
But it doesn’t want to reboot, I even rebootet it again and this message appeared again, but it still didn’t boot.
and on xda someone says this: There is an edit button in case you need to add something (just to let you know).
You have to follow Step 1. The image there should be fine with A2017G since it will only add fastboot support. However, I am not responsible if anything goes wrong!
I would do it like this (Section B in this thread’s OP, Steps 5,8,9,10,11):
Boot into TWRP
If there’s none open, open a new command window in that folder again (Shift + right-click and “open command window here”)
Type “adb shell dd if=/dev/block/bootdevice/by-name/fbop of=/sdcard/fbop_lock.img” and hit enter
Type “adb shell dd if=/dev/block/bootdevice/by-name/aboot of=/sdcard/aboot_lock.img” and hit enter
Type “adb pull /sdcard/fbop_lock.img” and hit enter.
Type “adb pull /sdcard/aboot_lock.img” and hit enter
After that follow Step 1 in the other thread.
As soon as you’re done, boot into TWRP.
Then follow section B in this thread’s OP, Steps 14, 15 ,16, 17, 18.
Note that this won’t resolve your issue with not being able to boot into the ROM.
*EDIT*
If you are in TWRP do this to boot into EDL:
Open a new command line window
Type: adb reboot edl
Try again with MiFlash”
Would this fix my problem?
I had the same error with the provided TWRP and then was successful with the TWRP mentioned in the comments. However that version won’t let my phone boot at all. Just an endless ZTE screen. How do I get it back?
how????
Hi! When i i’m using to command “axon7tool -r gpt boot recovery” it only says “Failed to connect” What is wrong? I’ve tried to redo everything multiple times and i’ve even tried it on another computor with the same issue?.
Check the prerequisites section and revise once again.
How do i correctly rename to copy of the recovery from recovery.img to recovery.bin? I assume that it shouldn’t be recovery.bin.img?
https://uploads.disquscdn.com/images/03f3176f6581e8873ad7dfb7fb2f151529ed1f36a40c66be5b6e4d21811580c1.jpg Just to be clear the .img is an extension which symbolizes the file to be an image file. However, in the post it is asked to rename the file to recovery.bin and not convert. Take a look at this image.
Aha ok. In that case i did it the right way. What could be the cause of the failed to connect error in step 6 then?
A. Install Zadig 2.2 drivers if you haven’t done before.
B. connect phone to pc and confirm it says QUSB_BULK in device manager
C. adb reboot edl
D. when in edl mode open zadig 2.2 again and install driver
Try the above. it should work now.
In case the above method doesn’t work then try the steps mentioned below.
1. Navigate to the ADB folder.
2. Click on View» Options» Change folder and search options.
3. Under the View tab uncheck ‘Hide extensions for known file types’.
4. Then.rename the extension and change recovery.img to recovery.bin.
5. Finally, try again while following the steps A, B, C, D mentioned above.
Check the image. https://uploads.disquscdn.com/images/4a650729f47cb1b2add2eb546ede140d69f50dbf0d0f96f2a7af60e2e51be139.jpg
Hope this solves the issue.
Thanks! This resolved my issue with the “QUSB_BULK” problem. I have a new problem though, i get the following error when i’m entering the command “axon7tool -w recovery” along with the axon7tool exe crashing:
C:adb>axon7tool -w recovery
Connecting to device…
Sending programmer…
Connecting to programmer…
log: Supported Functions: program configure nop firmwarewrite patch setbootablestoragedrive ufs emmc power benchmark read getstorageinfo getsha256digest erase peek poke getnumdisksectors
log: Supported Functions: program configure nop firmwarewrite patch setbootablestoragedrive ufs emmc power benchmark read getstorageinfo getsha256digest erase peek poke getnumdisksectors
Writing recovery …
F: failed to open recovery.bin
terminate called after throwing an instance of ‘std::runtime_error’
what(): error: No error
What could be the cause of this?
Try this TWRP instead: http://penlane.me/fileserver/uploads/twrp_rec_tenfar.zip
Follow the same steps.
I got the same error with that file aswell. It’s the exact same issue as Garry Walker showed below.
Were you able to fix this problem, i also get this “failed to open recovery.bin” problem
Yes i was.
You have to open open the windows file explorer then locate the view button in the top, then press options to the right, then press view and uncheck “Hide file extensions for known file types”.
After that you should be able to rename the recovery.img to recovery.bin.
Note that the recovery.bin should not have the disk icon as the img files have.
hi, it doesent work for me: F: failed to open recovery.bin… tryed another twrp image but doesent work.What do i have to do to get it running?
https://uploads.disquscdn.com/images/2802a1c681e6d54a8123f58d9e4be885918729b813798bdc011851c01f3ead75.png
Were you able to fix this problem, i also get this “failed to open recovery.bin” problem
I did not try, because a few days later I got 7.1 and didn’t needed to root my A2017G anymore. (Gary Walker)
thank you, finally I got it and now have root
Nice!
after I open twrp and try to reboot I get stuck at the zte lgog and can only boot into twrp again
really like the tutorial, could you describe also how to do a copy of the recovery.img. SU is not working for me…
Do you mean stock recovery??
The step, that is mentioned in the prerequisites. Make Copy of the Recovery.Img
It means you need to make a copy of the TWRP image file you downloaded, paste it in the same ADB folder and rename the image file to recovery.bin
Hi, at step 5, my decive is showing in Device Manager, but with a yellow exclamation mark next to the QUSB_BULK text. When I try the script at step 6 it simply wont run. Any tips?
Hi! Did you resolve this issue as i cannot get the script to work.
I followed the guide for the TWRP installation exactly but when I tried to reboot into TWRP at step 12, all I get is a black screen and a red LED notification light. I am able to boot into android and use my phone no problem but I just can’t boot into recovery at all… Sorry, I’m still really new to this and any help would be greatly appreciated! My phone is the a2017g on B08.
I have the same issue, where you able to fix this?
Thanks for the info! Just updated the tutorial.
were you able to verify that you rooted the phone? I haven’t had any luck yet… Could it be because it is a different build version? Mines a A2017G b06.
I get this error when trying to unlock the bootloader:
C:UserskwhitDownloadsminimal_adb_fastboot_1.4.1_portable>adb shell dd if=/dev/block/bootdevice/by-name/fbop of=/sdcard/fbop_lock.img
dd: /dev/block/bootdevice/by-name/fbop: Permission denied
Any ideas?
img Files are on the device
Hi, try this: Install TWRP first, boot the device into TWRP using “adb reboot recovery” command and follow the unlocking bootloader steps.
but my device wont boot after that, only into twrp