Google Pixel 3 and Pixel 3 XL are the latest flagships from Mountain View California. Featuring excellent cameras and a stock Android experience, the devices have also kept the tradition of being some of the hottest devices amongst third-party android developers. Less than a couple of months since launch, even fewer days since the devices made it into the hands of consumers, developers had already found a way to root the Google Pixel 3 and Pixel 3 XL. Rooting is not entirely impossible without a custom recovery, as we’ve seen many times. Having one though makes rooting as well as many other things easier and possible. When we showed you how the Google Pixel 3 can be rooted, it didn’t have a working TWRP build. Well, now it does, somewhat, and you can install TWRP 3.2.3 on Google Pixel 3 and Pixel 3 XL right now.
Warning
Installing a custom recovery on your device requires unlocking the bootloader which will void its warranty. If you’re here though you’ve probably already made up your mind about it. We can assure you that the method mentioned below has been successfully tested and that it works perfectly fine. What we can not assure you of is that everything that you do while (even if you follow this guide exactly) will produce the desired result. That is to say, there’s always a risk that something can go wrong. In which case, you must understand that you were warned, and you still went with it anyway. Therefore, DroidViews cannot be held liable for any damage to your device.
The process neither requires you to format your device nor it should be formatted automatically. Still, make sure you have backed up everything important, including files and folders on your device’s internal storage. Creating a backup is never a bad idea.
Requirements
- A Google Pixel 3 or Pixel 3 XL.
- The bootloader should be unlocked in order to flash a custom recovery image. If you don’t know how to unlock the bootloader, we’ve already published a guide describing the process. You can check it out by clicking on the link below but make sure you only unlock the bootloader, do not root it, not yet.
- A Windows, Mac or Linux computer with ADB and fastboot installed and set up. You can check out the following guides on how to install adb and fastboot according to your operating system.
Note
It hasn’t been long since the third generation of Google Pixel devices came out. In other words, they are still new devices and development, therefore, is also in the early stages. That’s also true for this build of the TWRP recovery for the devices. While most things should work, MTP file transfer currently does not work. According to XDA Senior Recognized Developer Dees_Troy, this won’t be fixed until the devs have time to do it. We have no word on when that will be. Users can still use adb to push and pull files which is not as convenient but it is something.
Downloads
- Google Pixel 3
- Google Pixel 3 XL
twrp-3.2.3-x-xxxx.img: This is TWRP recovery image which will have to be saved to your PC, preferably inside the adb older on your computer. If you installed the minimal adb and fastboot on your Windows from the link above, the location of the adb folder should be C:\Program Files (x86)\Minimal ADB and Fastboot unless you changed it during installation.
twrp-pixel3-installer-xxxx-3.2.3-x.zip: This is the installer file that you’ll need to transfer to your phone’s storage.
How to install TWRP on Google Pixel 3 and Pixel 3 XL
- Connect your Pixel 3 or Pixel 3 XL to your PC using a USB cable.
- Next, launch Minimal ADB & Fastboot on your Windows PC. You can find it in the start menu or search for it. Mac users will need to launch a Terminal window inside the ADB folder. Linux users can simply launch a Terminal provided ADB was installed system-wide, as mentioned in the tutorial linked above.
- Check the connection by entering the following command in the command window or terminal.
adb devices

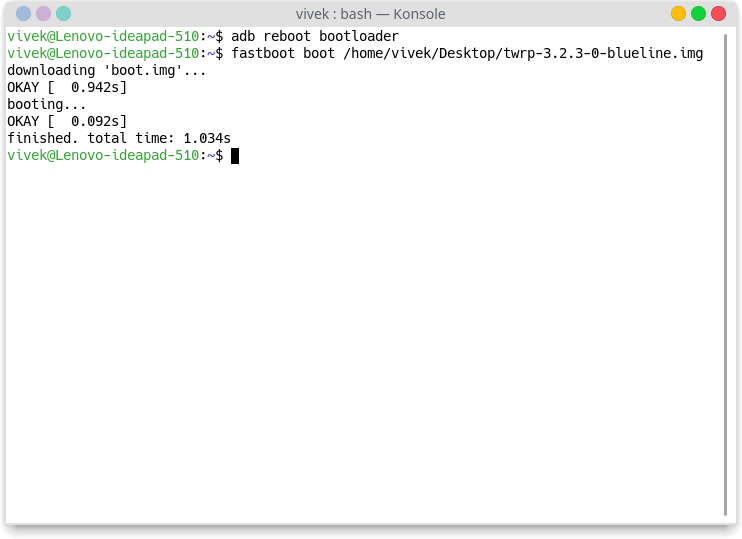
Depending on your Linux distro you may have to use ./ before every command. Mac users will need to use it as well. You should see your device’s serial number followed by the word device. - Next, boot your device into fastboot mode with the following command.
adb reboot bootloader
- In the Terminal, enter this command now to boot your device with TWRP.
fastboot boot /path/to/twrp-3.2.3-x-xxxx.imgIn the command above, replace /path/to/ with the actual path to the twrp file. You don’t need to type a path if the twrp file is already placed in the adb folder. Similarly, use the correct name of the TWRP image file you’ve downloaded from above. For instance, if you’re flashing the image on a Pixel 3 and have the twrp image file inside the adb folder, the command you need to use will be
fastboot boot twrp-3.2.3-0-blueline.img
- When your device boots up in TWRP recovery, swipe the slider at the bottom to allow the recovery to modify your device.
- Select Install and then select the twrp installer zip that you transferred to your Pixel 3/XL earlier. Swipe at the bottom to flash it.
- When it’s done, tap on the Reboot system button to reboot your device.
Voila! You now have official TWRP 3.2.3 installed on your Google Pixel 3 or Pixel 3 XL.
Read next:

Join The Discussion: