
Releasing a mini version of flagship devices has now become a rampant trend among smartphone manufacturer. It was started by Samsung with Galaxy S3 Mini and was later caught up by HTC. Another major Android player, Sony has also stepped into the race by introducing the Xperia Z1 Compact just a week ago.
Sony’s new phone has not even been officially launched as we write these lines, but the well-known developer DooMLoRD, who has made significant contribution to the Xperia community, has added another star to his stature by achieving root access on the Xperia Z1 Compact. Besides rooting the device, he has also made out a way to install the CWM recovery on it.
I had bought the Xperia Z1 a few months back but could not root it because unlocking the bootloader would have broken the camera. Luckily, unlocking the bootloader does not affect the camera on Xperia Z1 Compact.
Warning:
To be able to root Xperia Z1 Compact, you need to unlock its bootloader first and doing that will void its warranty. Further, the procedure given below is considered risky. We do not hold any responsibility with us, Proceed at your own risk.
Requirements:
- Bootloader unlocked
- Working fastboot
- Stock Firmware version:
- Android 4.4.2: 14.3.A.0.757 – v04 or 14.3.A.0.681 – v03
- Android 4.3: 14.2.A.1.142 – v02 or 14.2.A.1.114 – v01
Prerequisites:
- Go to Sony Developers portal and unlock the bootloader of your Xperia Z1 Compact. Please note that unlocking the bootloader will factory reset your phone, so do not forget to backup your data.
- Download and setup Android SDK on your computer. Read our comprehensive guide for detailed information.
- Install Sony USB drivers on your computer.
- Download DooMLoRD’s custom kernel for Z1 Compact: Advance Stock Kernel with Recovery v04 (FW:14.3.A.0.757)
- Download the latest version of SuperUser zip file: UPDATE-SuperSU-vx.xx.zip
- Enable USB Debugging from Settings> Developer Options. You can refer to our tutorial on the topic to activate developer options on your device.
Root Xperia Z1 Compact:
Having made sure that you have not missed any of the preparatory steps given above, you can proceed to flash the custom kernel image file via Fastboot. Let’s see how to do it.
- Copy the downloaded Z1c_DooMLoRD_AdvStkKernel_FW.img file to the platform-tools folder on your computer. This directory is found in Android SDK.
- Rename it as boot.img.
- Now boot your Xperia Z1 Compact into Fastboot mode. Here is how you can do that: turn off the phone, then press and hold the Volume Up button and connect the device to the computer with a USB-cable.
- Launch a command prompt from within the platform-tools folder. To do this, press Shift + Right-click at an empty space in the folder where the Fastboot and the .img file are present.
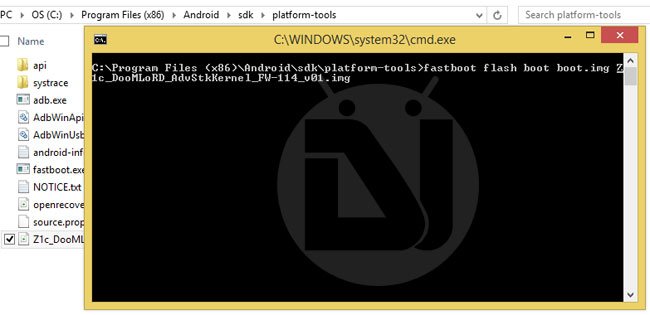
- Type the following command:
fastboot flash boot boot.img - Now hit the Enter key.
- When the kernel image is flashed, issue the following line:
fastboot reboot
-
Doing this will reboot your phone. Your Z1 Compact now has CWM installed on it.
- Copy the latest SuperSU zip file to your device.
- Reboot it into recovery mode. Turn your phone off and then turn it on. Just as the notification LED lights up, press the Volume Up/Down key for a couple of times. You should now enter the CWM Recovery mode.

- Using the volume keys, scroll to “install zip” option and select the UPDATE-SuperSU-vx.xx.zip.
- Confirm the installation by pressing the Power button.
- Finally, return to the main menu in CWM and select “reboot system now” option.
Your Xperia Z1 Compact will boot up and it’ll have SuperSU installed on it.

Now download the latest version of BusyBox Installer app from the Play Store: [googleplay url=”https://play.google.com/store/apps/details?id=stericson.busybox”]

My phone went into a infiniti loop restarting showing the Sony logo and the LED above the speaker is purple. Please help!
I’m having the same problem… completed all the steps, but after selecting ‘reboot system now’ it starts to reboot, the Sony logo shows up and the LED indicator shows up purple for a couple of seconds. then the logo fades away and I’m left with a brick, all I can do is get the CWM options up again but retried everything from there on for a couple of times with no results, the phone simply does not start up anymore.. anyone who knows a solution? 🙁 thanks in advance…