Samsung’s mid-range offering, the Galaxy A9 Pro is more than a year old now. It was launched last year running Samsung’s version of Android 6.0.1. But it wasn’t until only last month – more than a year after the release of Android Nougat – that the device received an official Nougat update from Samsung. At a time when most other users are expecting an Android Oreo update. And it is still Android 7.0, not 7.1. Better late than never they say. Now that the update is here though, many would probably be wondering how to get root access on the “new” software. You can follow this tutorial to install TWRP & root Samsung Galaxy A9 Pro (SM-A910F/9100) running on the latest Nougat firmware by Samsung.
Warning
You’ve probably already read all this more than a few times but it is our moral culpability to remind you again. Even if you follow this tutorial accurately, there’s no guarantee that you’ll be successful in rooting your device. On the contrary, you may come across issues and might even end up bricking your device. DroidViews cannot be held responsible for any such cases. We, however, would be happy to help as far as we can and can guarantee that the method described below works to our knowledge.
All data on your device including the internal storage will be wiped clean so make sure you have a backup of everything important.
Requirements
Now that that’s out of the way, there are a few things you’ll need to take care of before you begin with the process.
- Make sure you have installed the necessary Samsung USB drivers on your PC. For which you’ll need to first make sure you have a PC.
- Ensure that your Galaxy A9 Pro has at least 50% battery left so as to prevent any accidental shutdowns.
- Since you’ll need to connect your phone to your PC with a USB cable, be certain that the cable isn’t loose.
- Enable USB Debugging and OEM unlock found under Developer Options.
Downloads
Install TWRP on Samsung Galaxy A9 Pro (2016)
- Download the TWRP recovery linked above in the Downloads section, provided by developer ashyx. You should now have a file named twrp_3.0.2-1_sm-a910f_25716.tar.
- Launch ODIN on your PC. If you don’t already have ODIN, you can download the latest version from the download link provided in the Downloads section.
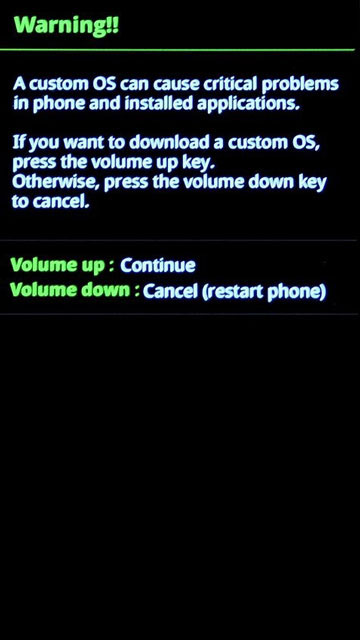
- Now boot your Galaxy A9 Pro into download mode. To do this, first power off your phone. Once powered off, press Volume Down button + Home button + Power button for a few seconds until you see a warning on your screen. Now press the Volume Up button to enter download mode.

- Connect your phone to your PC with a USB cable. The ID:COM port on ODIN should turn blue upon detection. In case it doesn’t, you’ll need to check those drivers again.
- Click on the AP button on ODIN and select the downloaded file – twrp_3.0.2-1_sm-a910f_25716.tar
- Before you go ahead and click Start in a hurry, make sure to uncheck Auto-reboot under the Options tab. Now click Start.
- Once the flashing process is complete, you’ll see a PASS! message being displayed on ODIN.
- Disconnect your phone and then power it off again by long pressing the Power button. Do not power it on yet.
Root Samsung Galaxy A9 Pro (2016) on Android Nougat
- Reboot to recovery immediately by pressing simultaneously the Power button+ Home button + Volume Down button. As soon as the screen goes blank, release the Volume Down button and press the Volume Up button whilst still holding down the other buttons. Your device should now boot into TWRP recovery.
- In TWRP recovery, select Wipe > Format Data and type yes. This will wipe everything on your device but more importantly, decrypt the data partition.
- Download the Magisk v14.0 and boot image patcher zip files to your PC and transfer them over to your phone via an MTP connection.
- Select Install and then select the Magisk zip file. Swipe at the bottom to flash it.
- Go back to the TWRP main menu, and select Install again. This time, flash the boot image patcher similarly. This is required to make sure your device’s data partition stays decrypted.
- Some users have reported a delay in unlocking the screen after rooting with Magisk. If you face it too, or you’d rather not take the risk, you can also flash SuperSU instead. The download link is provided in the Downloads section.
- Once done, tap on the Reboot system button that appears after the flashing process is complete.
When your device boots up, you should find the Magisk Manager app in your app drawer. If not, you can download and install the APK.


please update firmware malaysia
I can’t watch the .zip in the TWRP menu
Where did you put them?
I solved it