Release of Android Lollipop 5.1 is probably the most happening news this month, it has bought some real worthy features as well as enhancements to Lollipop 5.0. We have already recently covered a detailed overview of Lollipop 5.1 and its features. Of all the Nexus lineup, only a few including the Nexus 5, Nexus 7 and Nexus 10 have received the official factory images, but others like the Nexus 6 have also started to receive the over-the-air updates.
XDA member oldblue910 has managed to grab the OTA update zip to be installed manually. The update can be easily sideloaded over a Nexus 6 smartphone running stock Lollipop 5.0.1 LRX22C via the stock recovery and a few ADB commands. The advantage of an OTA over Factory Image is that it doesn’t tend to erase your device or make you lose any data, everything stays intact. Below we will list the procedure to sideload Android Lollipop 5.1 on Nexus 6. So, if you’re an excited peep like me, with zero patience, go ahead and update using this guide.
Warning!
Installing updates manually is a risky procedure if done wrong. Understand the process and follow everything to-a-T. DroidViews or any of its community members shall not be held responsible for any kind of damage or loss of your device. You shall proceed only at your own risk and understanding.
Get Your Device Ready
Now, before we go further with instructions, its necessary to complete a few requirements.
- Backup everything, just in case anything goes wrong. This includes device storage, SMS, contacts, apps etc.
- Charge your device to at least 60% to avoid any uncertain shutdowns during the process.
- Enable USB debugging in Settings > Developer options. If you don’t know how, follow our detailed guide here.
- Download the OTA update zip from below.
- Download the adb files and extract its content to the location where the OTA update zip is present.
Downloads
- OTA update Zip [LMY47D from LRX22C]: Link
- Make sure to setup Android SDK on your computer or simply download the following files: adb-and-fastboot.zip
Sideload Android 5.1 OTA on Nexus 6
- Extract the adb-and-fastboot.zip and open the unzipped folder.
- Rename the downloaded OTA file as update.zip and copy it to the “adb-and-fastboot” folder.
- Now click at an empty space in the folder, press SHIFT key + right-click.
- Select Open command window here from the pop-up menu that appears.
- Power off your Nexus 6.
- Press the Volume Down and Power buttons altogether until you see the bootloader mode , and release the keys.
- Now, press the Volume Down key until you see Recovery mode highlighted and press the power button to select it,
- The phone will reboot and display an Android bot with warning sign.
- Press and hold the Power button and tap the Volume Up key once.
- Nexus 6 will now enter the stock recovery mode displaying Android system recovery <3e> on the top of the screen.
- Connect the phone to the PC via USB cable.
- Now use Volume keys to highlight apply update from ADB and press the Power button.
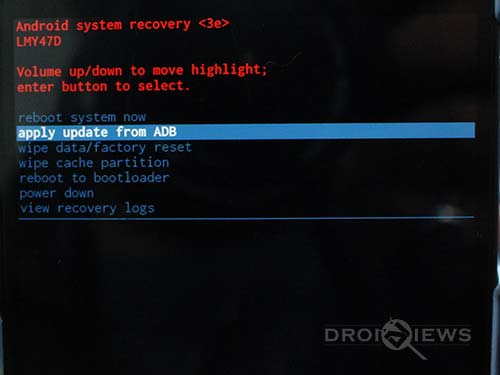
- The ADB screen will appear, turn over to the CMD window opened earlier and type in the following command:
adb sideload update.zip - The update will take a bit of time since its large file.
- Once done, the recovery mode will be enlightened again. Select reboot system now using the Power button.
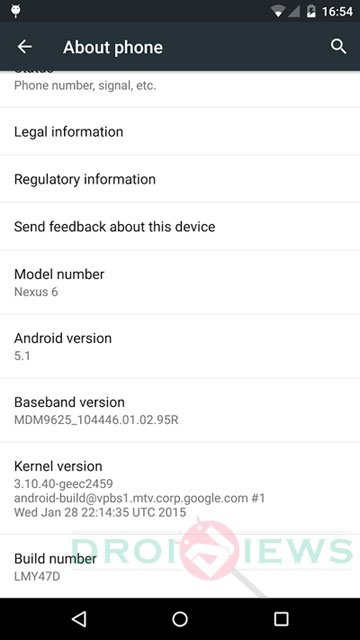
You can now enjoy Android Lollipop 5.1 on Nexus 6. Tell us your opinion via the comments, it’s valuable to us and will help us build a better community.
Note:
If you’re having Status 7 error while flashing the Android 5.1 OTA zip, download the Android 5.1 Lollipop factory images and flash it using this tutorial.


Cannot read side load…… Just like every site that promises easy steps to side load!!!!!!
There’s so many steps skipped. I wish someone would post a real step by step guide.
Hi, I have have just updated the steps. Try gain and let me know how it goes.
I’m having issues. I get Status 7, which appears that other people on XDA are getting, too. Status 7 says that system is mounted as RW — which Recovery does for whatever reason, I guess.
What’s you current Build version?
Build LRX22C.
And you phone has the stock recovery, right?
Can you confirm if you getting a message like this?
“Installing update…
assert failed: apply_patch_check(“/system/xbin/busybox”, “866220b22686c7d9f260ccadb5e3261d7807eb5a”, “a6d35d818192b95f8983b9ca94577a16bee5e349”).
E: Error in /cache/f9cee9e076-to-209b36c735-signed-1.zip
(Status 7)
Installation aborted?
This error means that the system partition has been modified, and the updater is aborting the install as a result.
That was not my failure.
My failure was more like….
Verifying current system…
/dev/block/platform/msm_sdcc.l/by-name/system has been remounted R/W; reflash device to reenable OTA updates
Status 7
Well, then you should try the factory images: https://dl.google.com/dl/android/aosp/shamu-lmy47d-factory-6c44d402.tgz
ya it doesnt work , the adb installs n it exists and heavens knows where the files are , thrs no any indication at which directory it is located , the adb files is just an .exe thrs nothing to unzip ,so the cmd n whatever command u type just wont work , im sure thrs an easier way , can i jus copy the OTA files into phone storage and update from the recovery like ‘ol days?!
Contact us over at Hangouts: djsaggi93@gmail.com
Yes, I understand that. Thanks!
Hi Dhananjay, I extracted the zip file into the folder where the ota exist, but got an error. I’m trying it now, again. Let see what happens.
You do not have to extract the OTA zip (keep it as it is), you need to extract the contents of adb tools zip (adb zip) to the directory where the OTA zip is present.
Can you show the cmd screenshot?
Thanks for the instructions, but I can’t get it to work, no matter how many times I try!
What is the trouble? Where are you getting stuck at?
For me I get protocol fault (no status)trying to sideload with TRWP any help would be appreciated!