Valorant is a popular online video game that has various arenas and fun characters who battle in teams to eliminate each other or complete missions. This famous shooter game is created by Riot Games and emphasizes precise gunplay, teamwork, and strategic decision-making. It features a variety of weapons, including pistols, rifles, shotguns, and sniper rifles that your character can choose to play with. However, gamers face a critical error message while starting or launching the game. In this article, we will mention a few methods that you can use to get rid of this error.
Methods to fix ‘A Critical Error Has Occurred’ in Valorant
1. Try To Reinstall Valorant On Your PC
Many gamers have tried to reinstall Valorant on their system and have successfully been able to get rid of the critical error message on the screen. To reinstall Valorant on your PC, follow these steps:
Step 1: Uninstall the game by pressing the Windows key on your keyboard and look for “Valorant” in the list of all your installed programs.
Step 2: Click on “Valorant” and select “Uninstall.” Follow the on-screen prompts to completely remove the game from your system. Also, remove all remaining files from your File Explorer such as the Riot Games file, riot vanguard files, and all files related to Valorant in your AppData folder.
Step 3: Once you have deleted all the files related to Valorant, you can restart your computer. It is a good idea to restart your computer after uninstalling Valorant and removing its files to ensure a clean slate.
Step 4: Download the Valorant installer from the official Valorant website. You will see a download button and you can click on it for the latest version on your computer.

Step 5: Install Valorant by locating the downloaded installer file that can be found in your Downloads folder. Click on the Install button and let the process take place.
Step 6: Once the installation is complete, you can launch Valorant from the desktop shortcut or the Start menu. The game may need to download additional updates, so ensure you have a stable internet connection.
It is Complete! You have successfully reinstalled Valorant on your PC and you can enjoy playing the game.
2. Select The Option to Run the Program In Administrator Mode
Sometimes running a game as an administrator can help improve stability. Certain games may encounter conflicts with other applications or require access to specific system resources that are only available when running with administrative privileges. Running as an administrator ensures that it has the permission to function well. Hence, if you run Valorant as an administrator it will help you get rid of the critical error. Follow the steps given below:
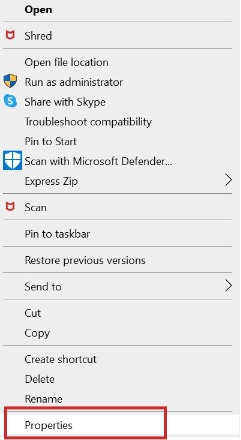
Step 1: First, click on your Valorant game and directly go to Properties from the menu. Select Properties here and it will open a new window.

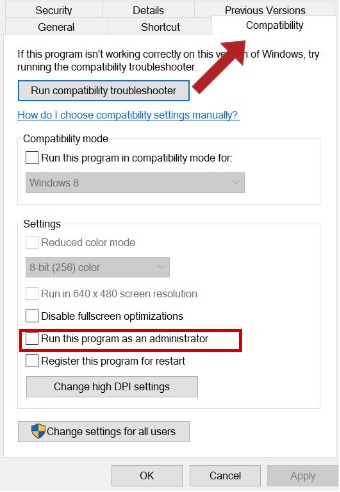
Step 2: Then, you will see a list of tabs at the top of the block. Click on the compatibility tab and choose to Run the program as administrator. Apply this option and click OK.

With the help of these two simple steps, you can run your game as an administrator and help in ending the conflicts with other programs.
3. Try And Update Your Graphic Drivers
Having outdated GPU drivers can also cause the critical error message to occur during your game. Graphics cards play an important role in gaming as they help in the visuals and many other features that help in the smooth running of the game. This is quite easy to fix and you can update driver in a few simple steps as mentioned below:
Step 1: Go to the Device Manager on your system by searching for it in the search box of the menu or hold Windows key + X and the options will open where you can click on it.

Step 2: Now, once you see a window with a list of options, click on the small arrow at the left of ‘Display adapters‘.
Step 3: This will open the list of the graphics drivers in your system. Right-click on this driver and select ‘Update Driver‘.

This will ensure that your driver has been updated, and now you can try restarting your Valorant game to see if the problem has been fixed.
4. Adjust The Compatibility Of Its Setup File
Many players have reported of having this issue solved on their system after using this method. By tweaking this particular file in your device directory, you can get rid of the problem and play your game without any interruption. Follow the steps given below:
Step 1: First, from your start menu on the Windows system, go directly to File Explorer in your local folder. You will see a folder called Riot Games in your local drive.
Step 2: Now, click on this folder. You will see another list of folders. Among these, choose the folder that says ‘VALORANT‘. This will take you to the Valorant directory.
Step 3: Click on the live folder, followed by the shootergame folder, then the Binaries folder. All in succession, and one after the other.
Step 4: Then you will see one last folder called Win-64. Click that folder and you will find a list of many other setup files.
Step 5: Here, select the file which says ‘VALORANT-Win64-Shipping file‘ and right-click on it to open its properties tab.
Step 6: In this Properties window, you will be able to see many tabs at the top part of it. Over here, you must choose the Compatibility tab and click on it. Finally, here we will be tweaking the setup file by checking the compatibility mode for your Windows version.
Step 7: Finally, run this program as the administrator option and click ok. Exit from here and restart your game to see if the crashes have stopped occurring.
5. Try To Remove MSI Afterburner And Rivatuner
MSI Afterburner and Rivatuner are resource-intensive applications that run in the background and consume system resources such as CPU and memory. MSI Afterburner is used for overclocking and disabling it can help improve performance. Uninstalling them frees up these resources, potentially improving overall system performance and responsiveness. Hence, here are the steps to uninstall them:
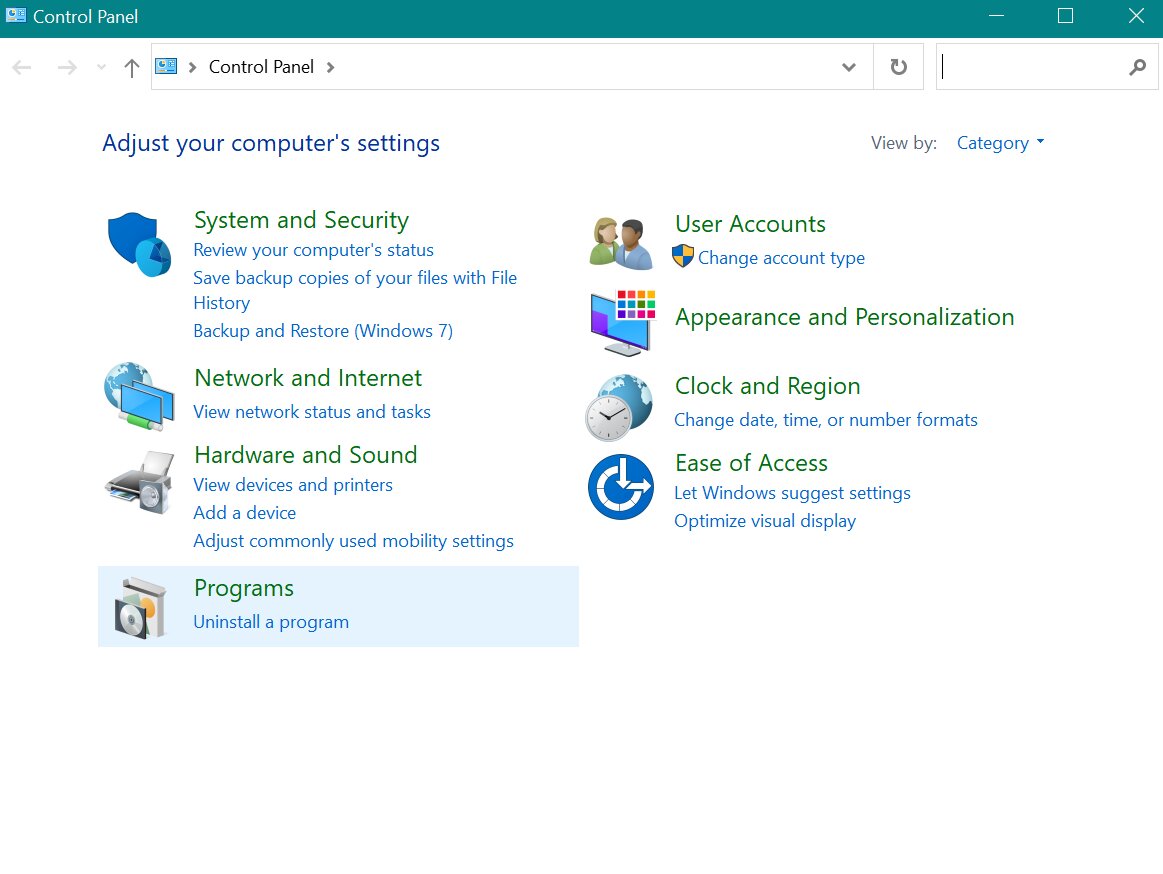
Step 1: Go to the Control Panel under the Start menu in your system to get started and here, head over to Programs and Features where you can find the option to uninstall programs.

Step 2: You will receive a list of every program that is currently installed on your machine after doing this.
Step 3: You will be able to see MSI Afterburner and Rivatuner here as well. They are usually in the Windows os as defaults. Click on these applications, and uninstall MSI afterburner. It can help you get rid of the overclocked GPU.
Step 4: Double-click on these applications, press enter, and they will be uninstalled from your system. Open your game and check if the problem has been fixed.
Conclusion
Sometimes an overload of applications in your system may cause your game to show a critical error due to an overclocked CPU or GPU. You can also try and ensure that the VGC service is running properly and check if your BIOS has been updated. These steps will ensure that you can launch and play your game without any interruption.

Join The Discussion: