With time everything changes and we need to be in pace with time. The same goes for our smartphones too. The manufacturers release updates regularly that adds new features to the phone, making it feel new with every update. OnePlus has recently started rolling out stable Android Nougat based OxygenOS 4.0 OTA update for OnePlus 3T.
Most of the OnePlus 3 users have already received a notification of the update while the OnePlus 3T users have not. OxygenOS 4.0 OTA update for OnePlus 3T is available through OTA. However, the update is being rolled out in a phase-wise manner by the OnePlus team. but it may take a few weeks time to reach all corners of the world.
You can either wait for the update through OTA or can update manually. Update your OnePlus manually if you just cannot hold your excitement to try hands on the new features that the update has to offer. This article explains you, how to download the update manually.
Update:
How to Install Oxygen OS 4.0.1 on OnePlus 3 and OnePlus 3T
The new update has various new features and upgrades to offer that are to make the experience with OnePlus great and awesome. The new features and upgrades include Multi-Window View, new and improved notifications design, Custom DPI Support, improved settings menu design, and much more.
OxygenOS 4.0 Update on OnePlus 3T | Features
- New version of Android 7.0 Nougat
- Custom DPI Support
- New Settings Menu Design
- New Notifications Design
- Notification Direct Reply
- Multi-Window View
- Status Bar Icon Options is added
- Provides better Shelf Customization

Prerequisites
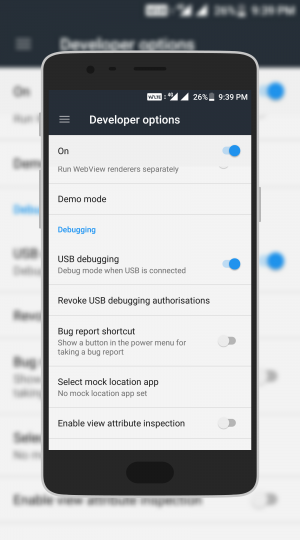
- Enable Developer Options.
Go to Settings –> About phone –> Tap 7 times on Build Number to enable the developer options. - Go back to Settings –> Developer Options –> enable USB Debugging.
- Make sure that you have latest Minimal ADB and Fasboot Setup drivers installed on your computer.
- OTA file flashing will not erase your data. But still, we recommend you to take a full backup of your apps and data before proceeding further.
- Maintain at least 50-60% charge to prevent accidental shutdown.
Download OxygenOS 4.0 OTA Update for OnePlus 3T
- OxygenOS 3.5.4 to OxygenOS 4.0
- OxygenOS 4.0 Full Stable ROM for OnePlus 3T
- OxygenOS Open Beta 1 for OnePlus 3T
Method 1: Install from Internal Storage
This method will only work when you have stock recovery installed on your device. Don’t try this method on any custom ROM, tt may brick your OnePlus 3T.
- Download the Latest OTA file from above link
- Save the downloaded OTA file in your device.
- Now connect your device to PC.
- Go to the ADB folder on your PC, Then open the command prompt by pressing SHIFT Key + Right Mouse Click and selecting Open Command Window Here.
- Execute the below command to reboot your OnePlus to recovery mode
adb reboot recovery
- Now, select Apply update from SDcard option and select the saved ZIP file in your device.
- Wait until the installation process completes.
- Reboot your device
- Done.
Method 1.1: Install from Internal Storage [Recommended]
- Download the Latest OTA file from above link
- Save the downloaded OTA file in your device.
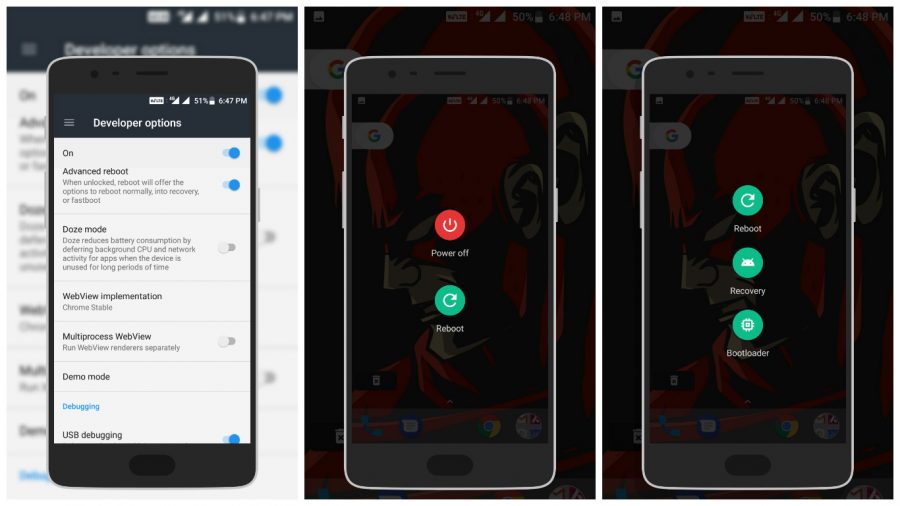
- Go back to Settings –> Developer options –> Enable Advanced Reboot and USB Debugging
- Now Long Press on Power Button, You can see 2 options Power-Off and Reboot.
- Select Reboot –> Click on Recovery –> Click Touch to Reboot (Your device will reboot in recovery mode).
- Select the language
- Now, click on Install from internal storage and select the saved ZIP file from your device.
- Wait until the installation process completes.
- Reboot your device
- Done.

Method 2: ADB Sideload Method
- Download the Latest OTA file from above link
- Save the OTA in ADB folder on your PC.
- Now connect your device to the PC.
- Go to the ADB folder on your PC, then open the command prompt by Pressing Shift Key + Right mouse click and Select Open command window here.
- Execute the below command to reboot your OnePlus to recovery mode
adb reboot recovery
- Select ‘ADB Sideload’ in your device.
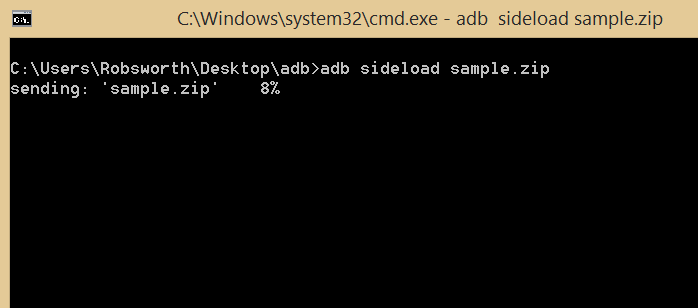
- In command prompt in your PC, execute the below command to sideload the OTA ZIP to your device.
adb sideload <filename>
- Now, replace the <fileName> with the name of the OTA file which is saved in the ADB folder.
- Wait until the installation process completes.
- Reboot your device.
- Done.
By following the steps listed above, enjoy the OxygenOS 4.0 on OnePlus 3T with new features and upgrades.


You should change the download nameto this article, because this particular line does not give the OxygenOS 4.0, rather the open beta version. “OxygenOS 3.5.4 to OxygenOS 4.0”
Thank you for the guide! I appreciate that! But it would be great if possible to include a note for stock hydrogen OS users that wish to switch to OOS 4.0. I ordered my device from China and it comes with H2OS. I would go straight to flashing OOS4.0 if these steps apply for this device too. I just wanted to make sure I’m not going to brick my device and that there are no traces of H2OS left after the flashing is finished. Thank you in advance and have a happy new year!