
The best thing about Android that make it different from and superior to other major operating systems in the world is its flexibility and capability of immense customization. We have been enjoying many features on our Android devices that the users of iOS and Windows Phone can only feel jealous off. One of my friends, who is a die-hard iOS fan for unknown reasons, was very excited because Apple added support for a third-party keyboard app in the latest version of iOS. Now just reflect for a moment what things you can do on Android!
Thankfully, Android users are privileged to enjoy 3rd party replacements for alm0st all system apps and the freedom to use a custom keyboard is just one of them. There are a lot of keyboard apps available at the play store. You can go for SwiftKey, Flesky, TouchPal, stock Google Keyboard or any other. However, if you own a Nexus, Motorola or any other device and prefer using the Google Keyboard to others, today we have come with a small but very handy tip for you. If you frequently use your phone’s keyboard and feel a little inconvenient about switching between alphabet and number panels, here’s how you can add a dedicated number row at the top area of the Google Keyboard.
Add a Dedicated Number Row to Google Keyboard
Quite obviously, you must have Google Keyboard app installed and enabled on your phone or tablet to be able to try the tips given below. You can download and install the Google Keyboard directly from the Play Store:
[googleplay url=”https://play.google.com/store/apps/details?id=com.google.android.inputmethod.latin”]Okay, now here’s what you need to do to enable the top number row on your Google Keyboard.
- Open Settings on your device, scroll to Language & input option and tap it.
- Tap Google Keyboard option.

- When you enter Google Keyboard Settings page, tap Appearance & layouts> Custom input styles.
- Now tap the Plus (+) icon at the upper right corner of the screen.
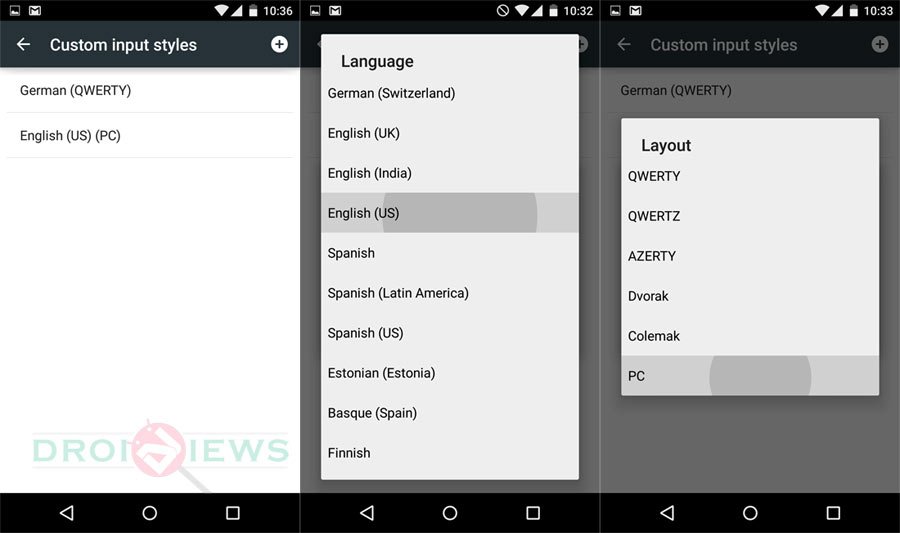
- Now tap Language and select your preferred language.
- Then tap Layout and select PC option.
- Go back to Google Keyboard Settings page and tap Languages and select the PC version of the language (see below).
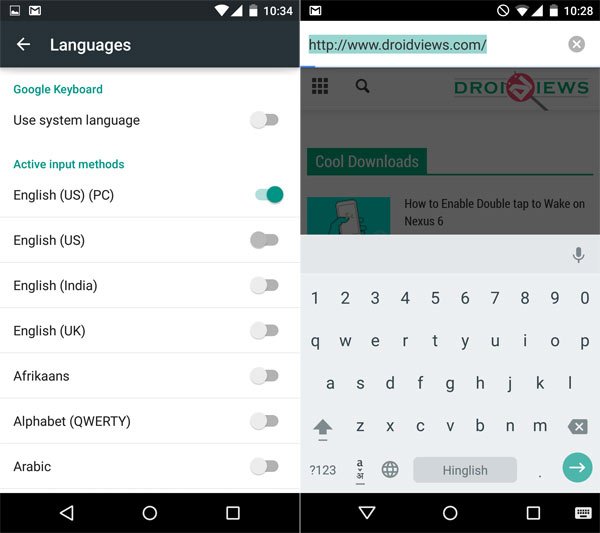
Done! You have successfully enabled the number row on your Google Keyboard. Just launch the keyboard and you should be able to see and use the number row at the top area of your keyboard. Enjoy!


Join The Discussion: